
Crew Board — How-To Guide
Setting up the iPad kiosk, signing crew in and out, and managing visitors aboard the vessel.
1 Understanding the Kiosk Concept
A kiosk is any device (typically an iPad mounted near the gangway) that displays the public Crew Board interface — the Welcome screen with three big buttons: Crew, Visitor In, and Visitor Out. Crew and visitors interact with this screen directly; they never log in with passwords.
Every kiosk has an auth token — a unique key embedded in the kiosk URL that authorises it to record sign-ins for your vessel. Without this token, anyone with the URL could log entries for your crew, so the token effectively replaces a password for the kiosk itself.
Master vs Secondary kiosks
You can register multiple kiosks per vessel — useful if you have one at the main gangway and another at the crew entrance, or a backup iPad in case the primary one fails. One kiosk is designated the Master:
- The Master kiosk is the source of truth. If the vessel loses network connection, only the Master continues to function — Secondaries lock with a configurable offline message.
- A Secondary kiosk stays in sync with the Master when online, but locks itself out when offline to prevent split-brain conflicts (two kiosks recording different states for the same person).
2 Registering a Kiosk
Open Crew Board → Kiosk Manager from the sidebar in the admin panel.
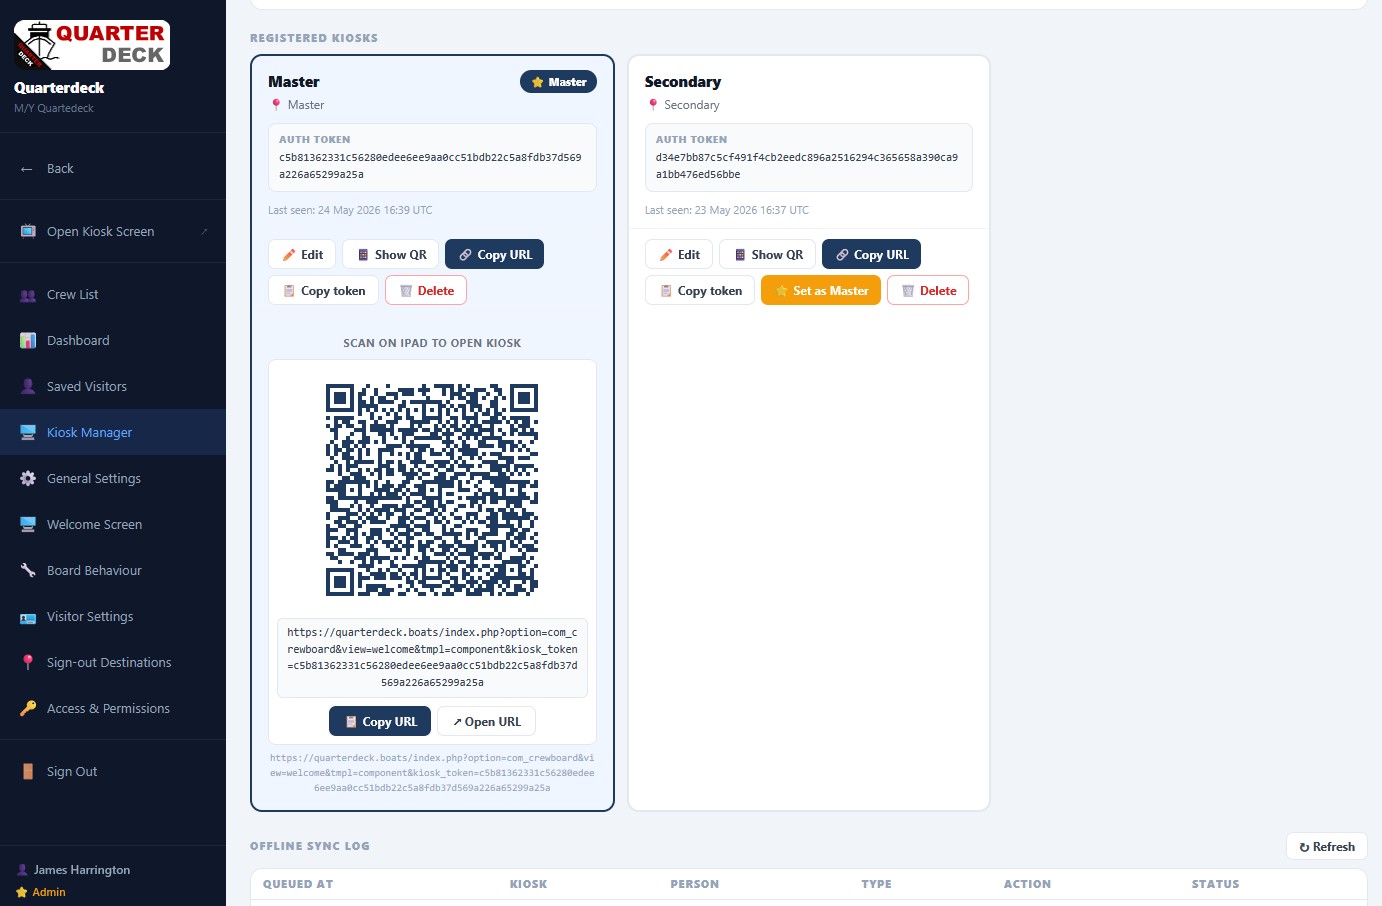
Adding a new kiosk
- Scroll to Register a New Kiosk.
- Give it a Kiosk Name (e.g. "Bridge iPad," "Crew Mess iPad").
- Give it a Location (e.g. "Gangway entrance," "Crew accommodation passageway"). This is just for your reference — it doesn't change behaviour.
- Click + Add Kiosk. The kiosk appears in the Registered Kiosks grid below with its own auth token and QR code.
Setting up the iPad
For each registered kiosk you can:
- Show QR — display a QR code; scan it on the iPad's camera to open the kiosk URL.
- Copy URL — copy the full kiosk URL to send via email or AirDrop.
- Open URL — open it directly in the current browser (mainly for testing).
- Copy token — copy just the auth token (rarely needed; mainly for support).
The typical setup on the iPad:
- Open the kiosk URL in Safari.
- Tap the Share button → Add to Home Screen. This installs the kiosk as a Progressive Web App with no browser chrome.
- Enable Guided Access (Settings → Accessibility → Guided Access) to lock the iPad to the kiosk app, so crew can't accidentally exit it.
- Mount the iPad in its permanent position near the gangway.
Designating the Master
The first kiosk you register is automatically the Master. To promote a different kiosk, click the orange ★ Set as Master button on the kiosk card you want to promote — the previous Master automatically demotes to Secondary.
- Don't share the URL or QR code with anyone outside the vessel.
- If you suspect a token has been compromised, click Edit on that kiosk → regenerate the token. The old URL stops working immediately.
- Always Delete a kiosk you're no longer using, rather than leaving its token active.
Monitoring kiosk health
Each registered kiosk card shows its Last seen timestamp. If a kiosk hasn't been seen in a while, it's likely powered off, offline, or someone has changed the URL. The Offline Sync Log at the bottom of the page lists any actions that were queued while a kiosk was offline and have since been synced back.
3 The Kiosk Welcome Screen
Once the iPad is set up, here's what crew and visitors see when they walk up to it.
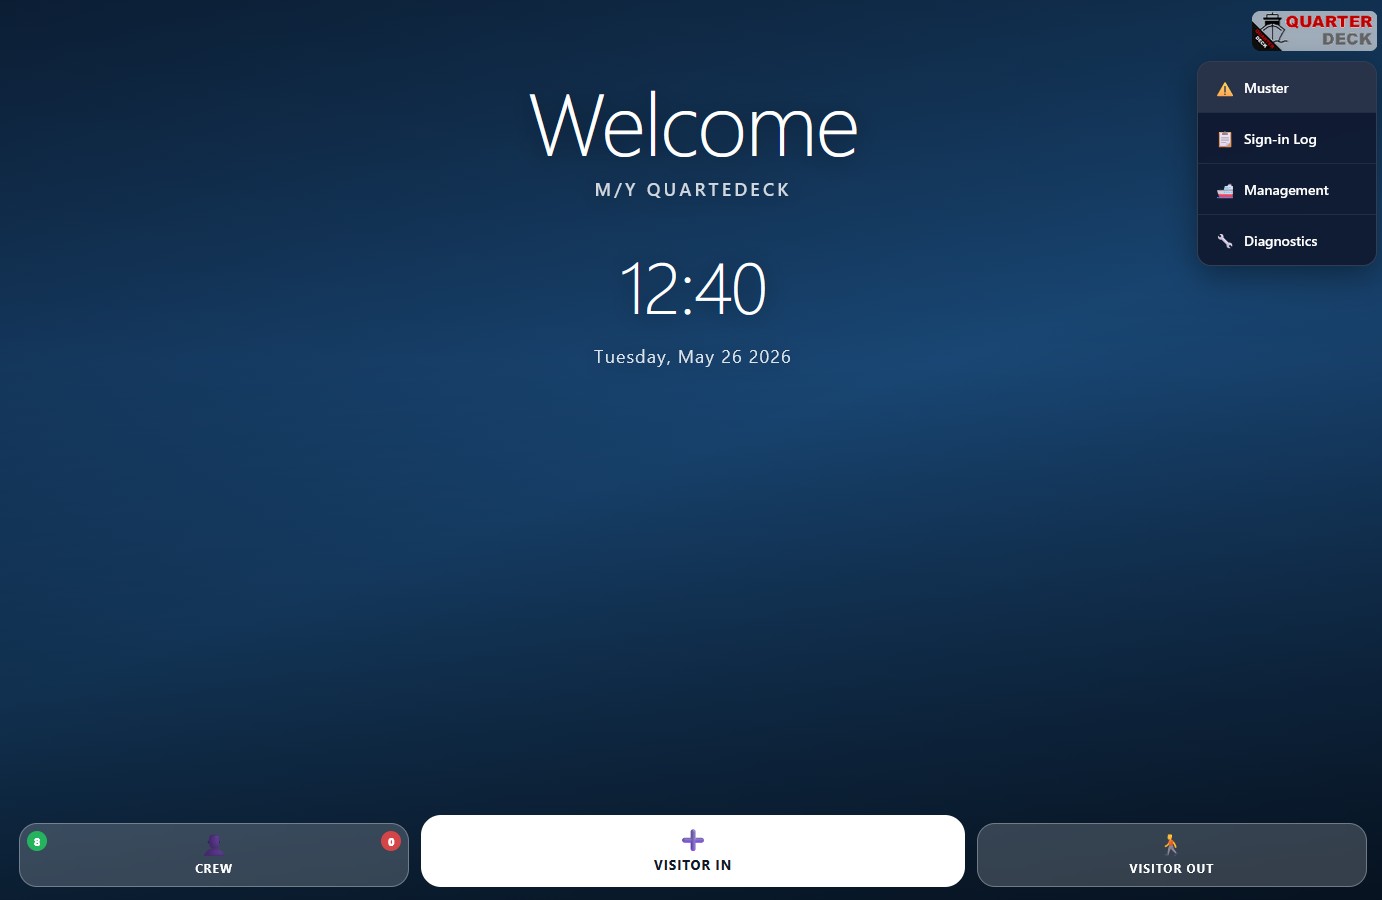
Three actions are always visible at the bottom:
- Crew — for crew signing themselves in or out. The number on top shows how many crew are currently on board (green) and how many visitors are aboard (red).
- Visitor In — for someone arriving at the vessel who isn't crew.
- Visitor Out — for a visitor leaving.
The hidden management menu
Tap the Quarterdeck logo in the top right corner to reveal the management menu:
- Muster — open the muster checklist (covered in Step 6).
- Sign-in Log — view recent sign-ins on this kiosk.
- Management — open the admin panel (PIN-protected).
- Diagnostics — show network status, sync state, kiosk identity. Useful for troubleshooting.
4 Crew Signing In and Out
When a crew member taps Crew on the kiosk, they see a list of every active crew member on the vessel, sorted alphabetically with an A-Z jump rail on the right.
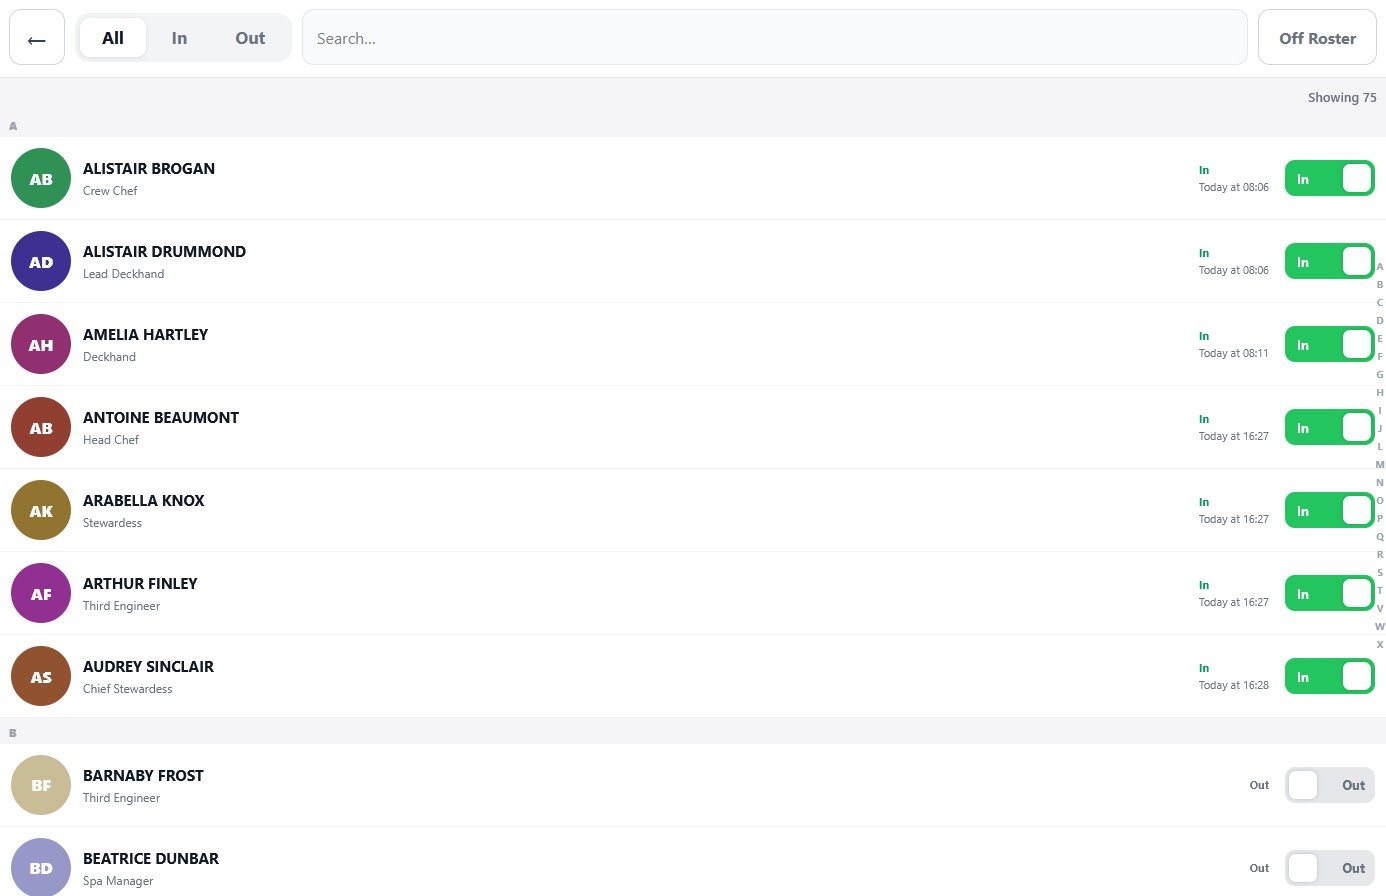
Signing in (arriving on board)
When a crew member is currently Out, their toggle is white on the right. Tapping it triggers a confirmation popup:
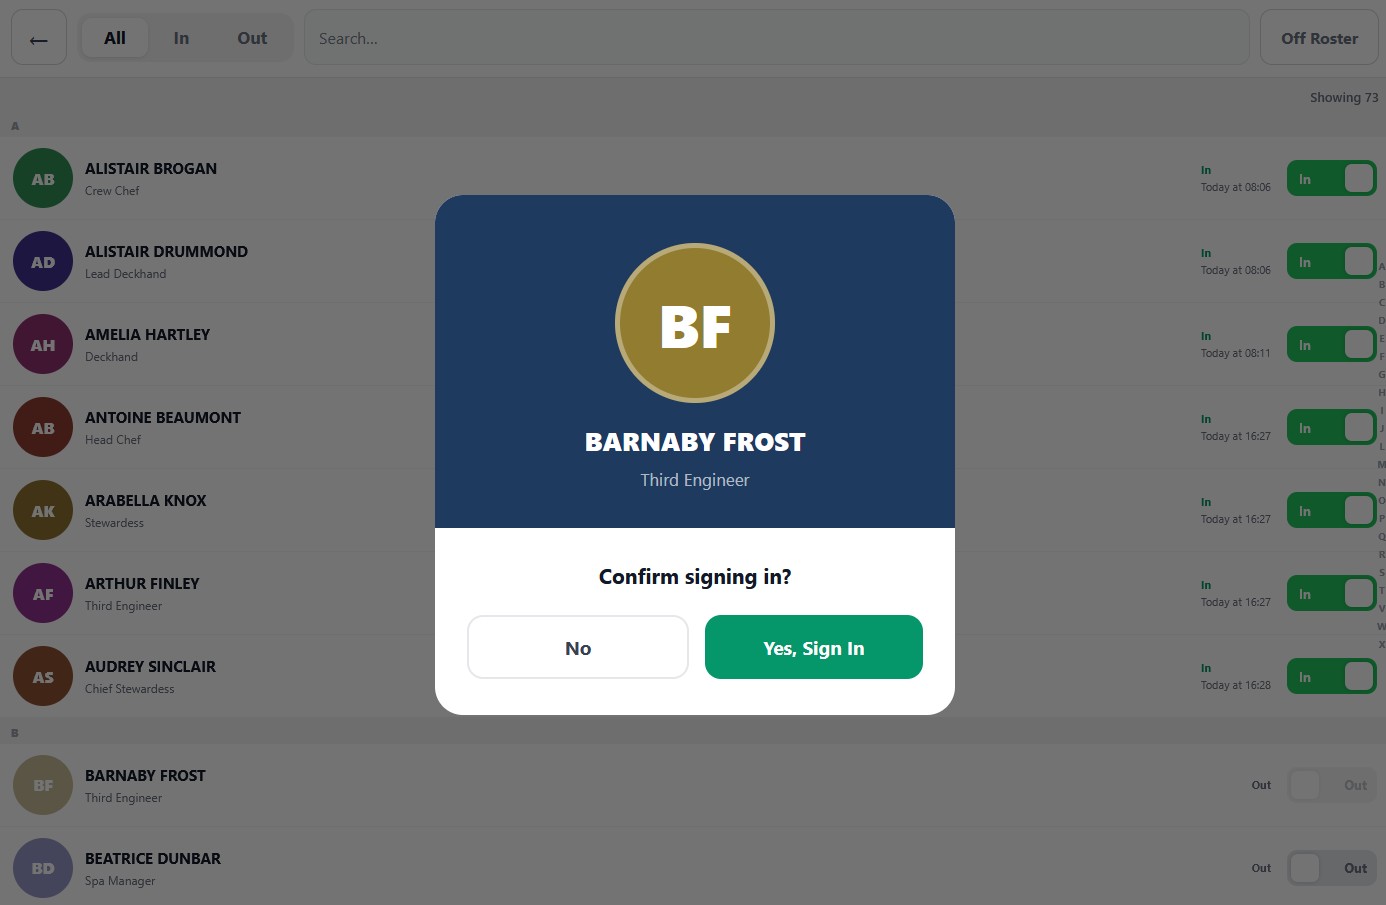
Tap Yes, Sign In to confirm. The crew member is now marked as aboard, with the timestamp recorded for the master's review.
Signing out (going ashore)
When a crew member is currently In, their toggle is green on the left. Tapping it opens a more detailed dialog:
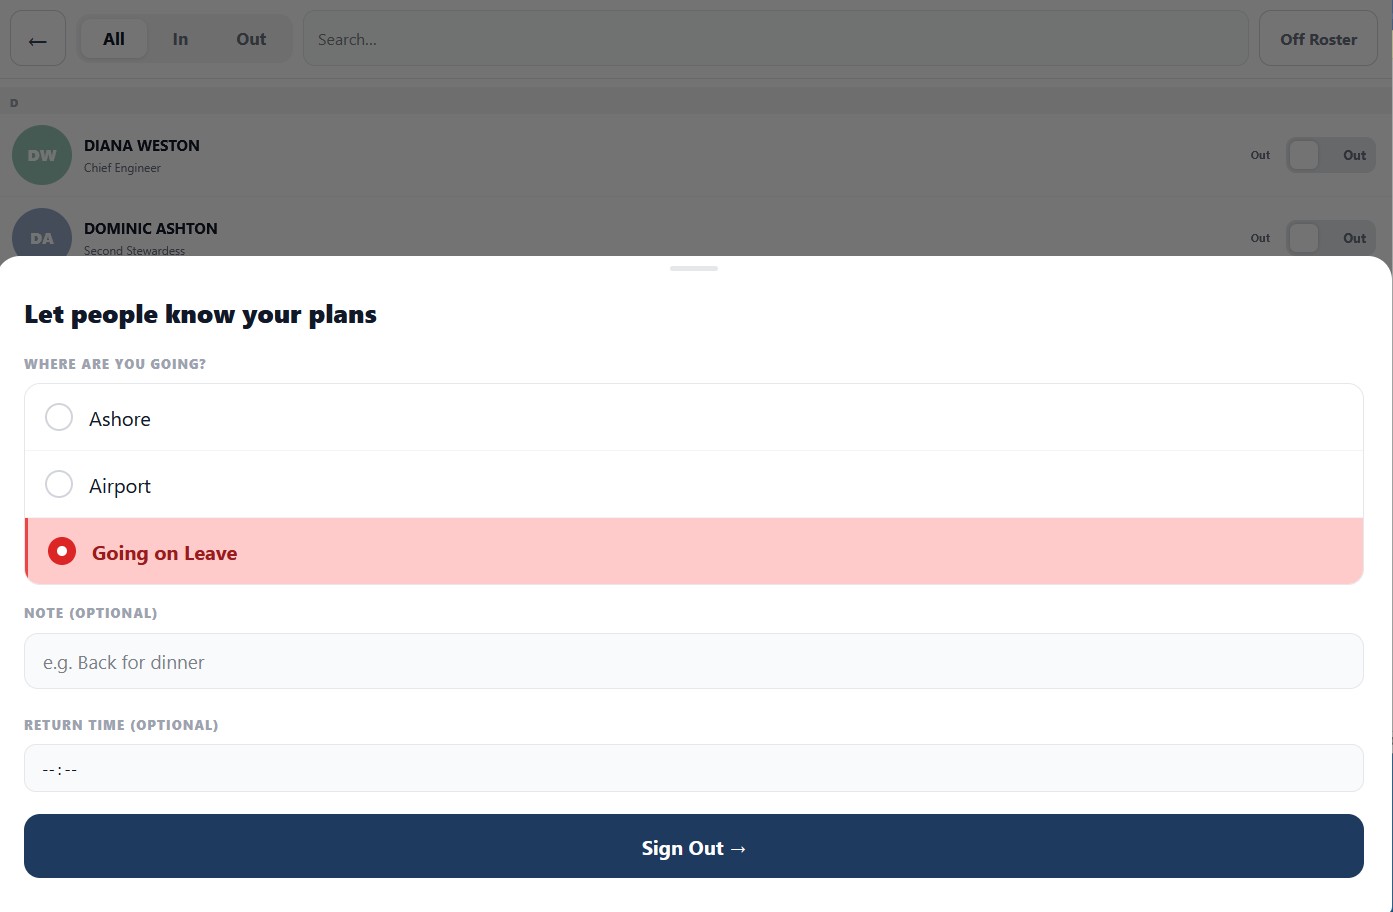
The sign-out screen lets the crew member share three pieces of information:
- Where they're going — Ashore, Airport, Going on Leave, or any custom destination you've configured (see Step 7).
- An optional note — "Back for dinner," "Picking up parts," etc.
- An optional return time — when they expect to be back.
"Going on Leave" is highlighted in red because it implies a longer absence — it changes the crew member's status to On Leave rather than just Ashore, which affects the muster list and the Crew Board KPIs.
Off Roster
The Off Roster button at the top right of the crew list takes a crew member off the active duty roster entirely — used when someone's on leave for an extended period. They remain on the crew list but don't appear in muster counts.
5 Visitors
Visitors are anyone aboard the vessel who isn't crew — surveyors, technicians, family of crew, owner's guests, contractors. They're tracked separately so the muster list can distinguish "people we expected" from "people we need to account for in an emergency."
Visitor sign-in
Tapping Visitor In opens a simple details form.
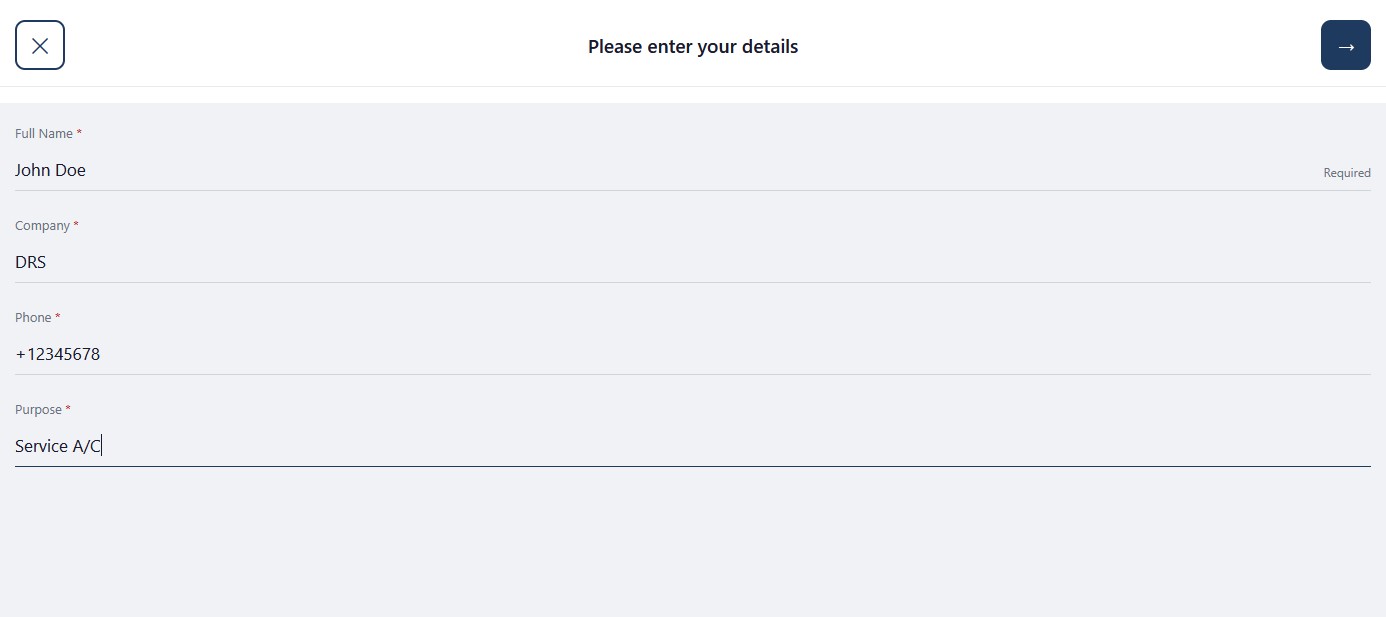
Required fields are marked with a red asterisk:
- Full Name
- Company
- Phone — for the master to contact them if needed
- Purpose — why they're aboard (e.g. "Service A/C," "Crew family visit," "Survey")
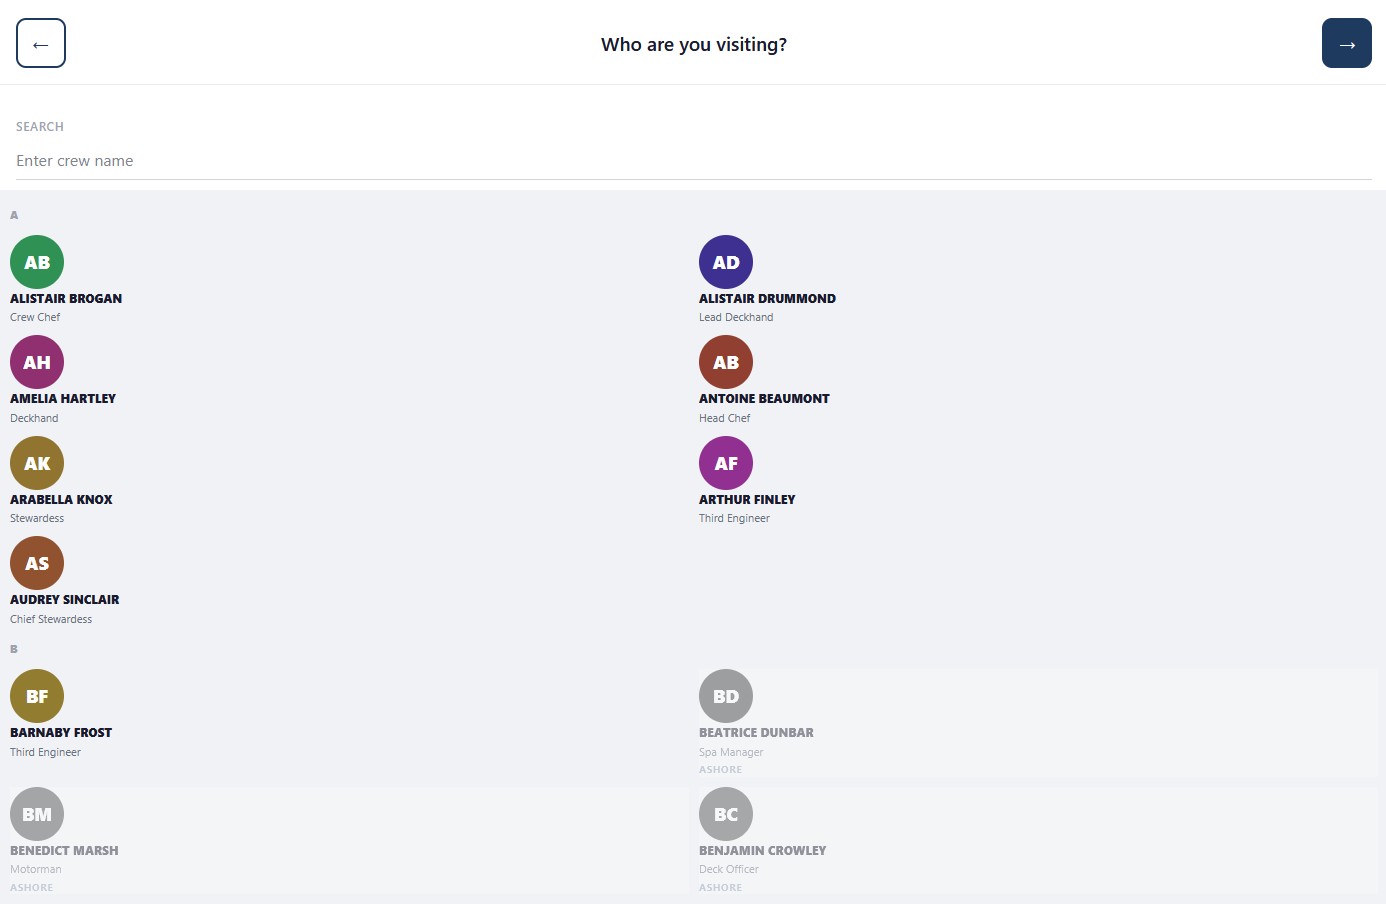
Who are you visiting?
After their details, the visitor selects who they're aboard to see — the host crew member. This step:
- Notifies the host that their visitor has arrived
- Provides traceability if anything happens during the visit
- Hides crew who are ashore (they obviously can't host)
Read and sign
The final step shows your vessel's safety briefing or visitor agreement, and asks the visitor to sign with their finger to acknowledge.
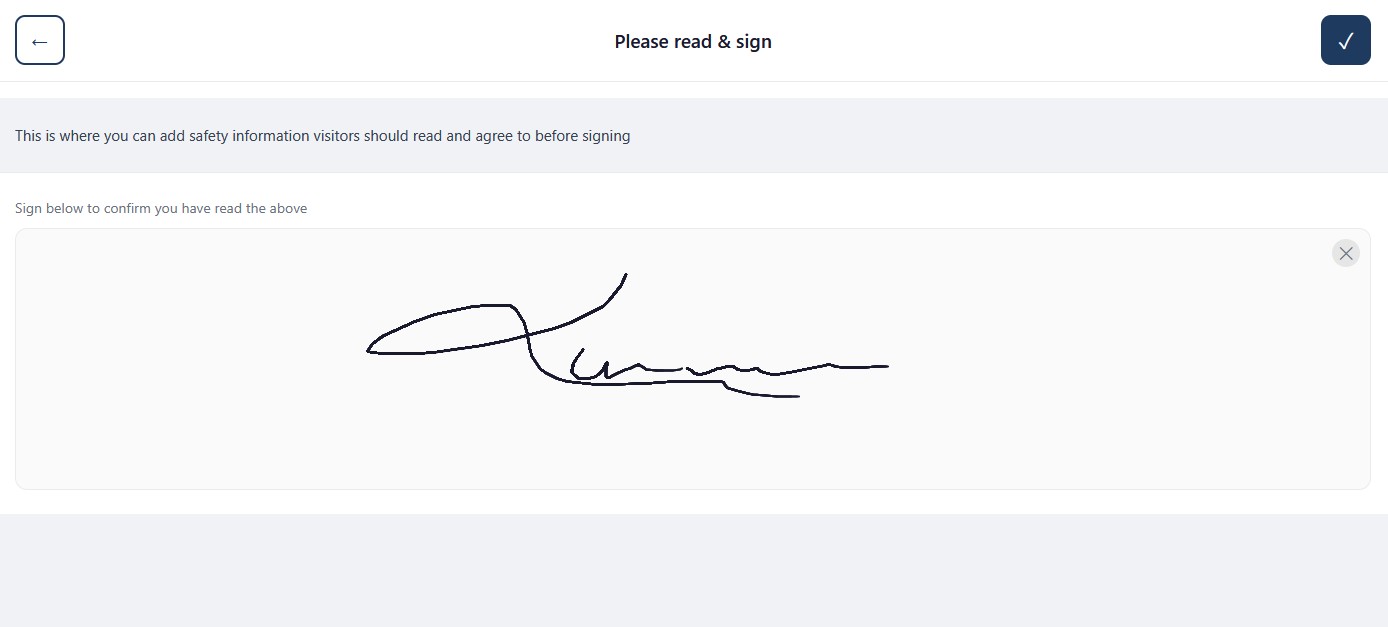
You set the safety briefing text in the admin panel (General Settings → Visitor Settings). Keep it short and clear; visitors won't read a wall of text.
Visitor sign-out
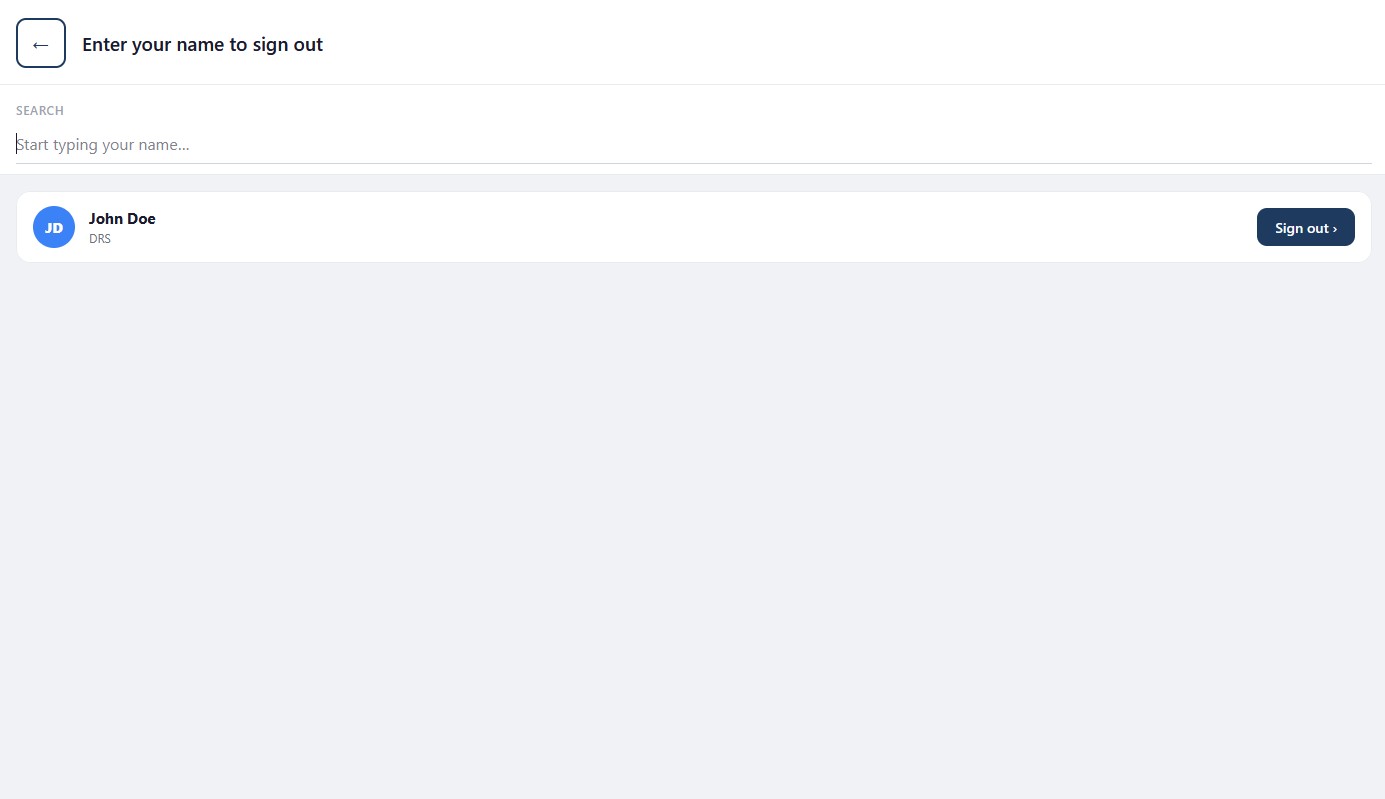
Tapping Visitor Out on the kiosk shows the list of currently-signed-in visitors. The visitor types their name (or taps their entry), then taps Sign out ›.
6 The Muster List
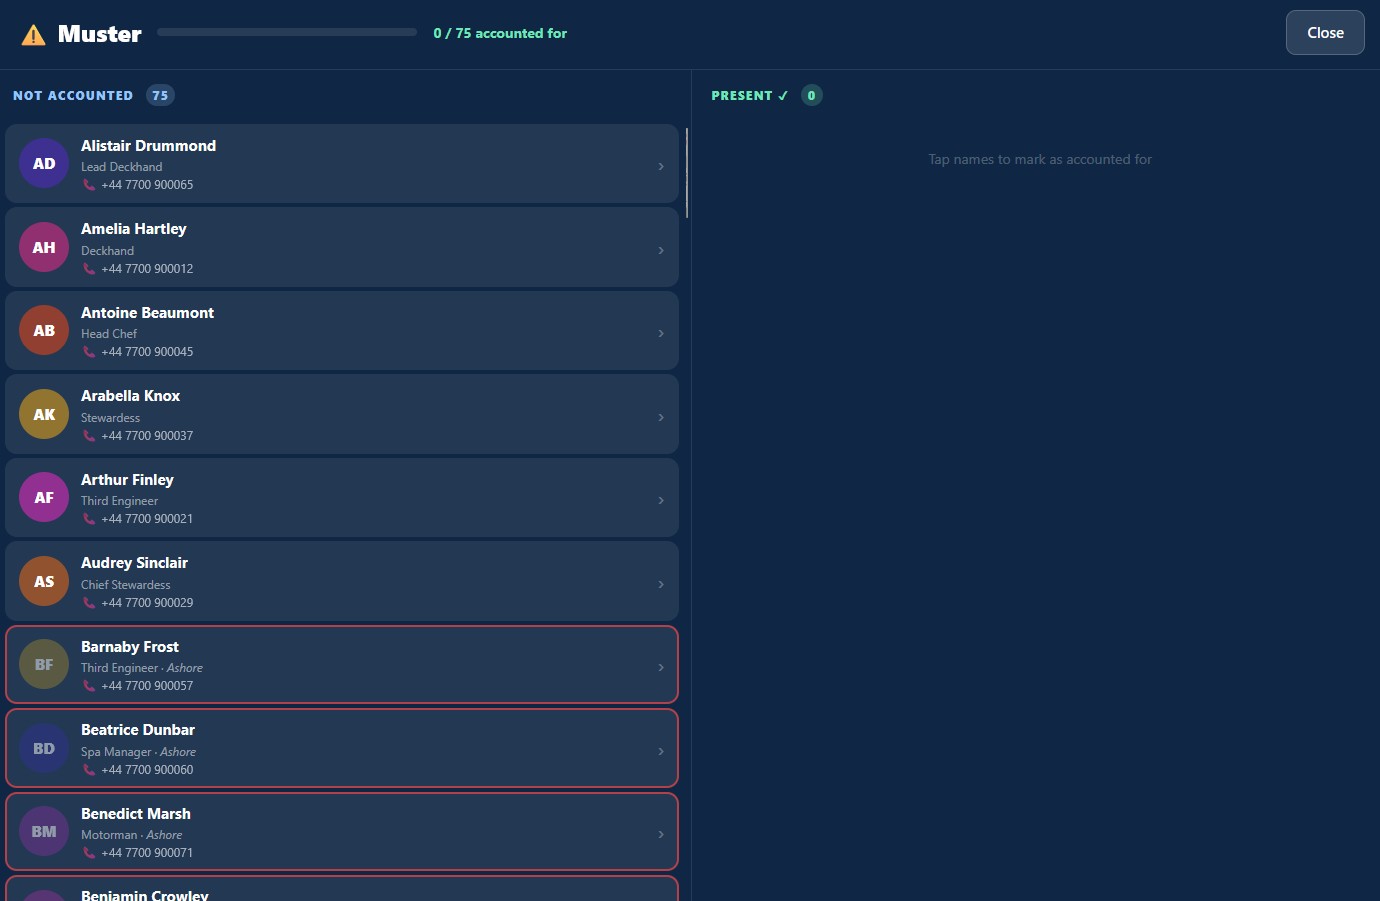
In an emergency — fire, abandon ship drill, real muster — the kiosk doubles as the muster checklist. From the management menu in the top right, tap Muster.
How muster works
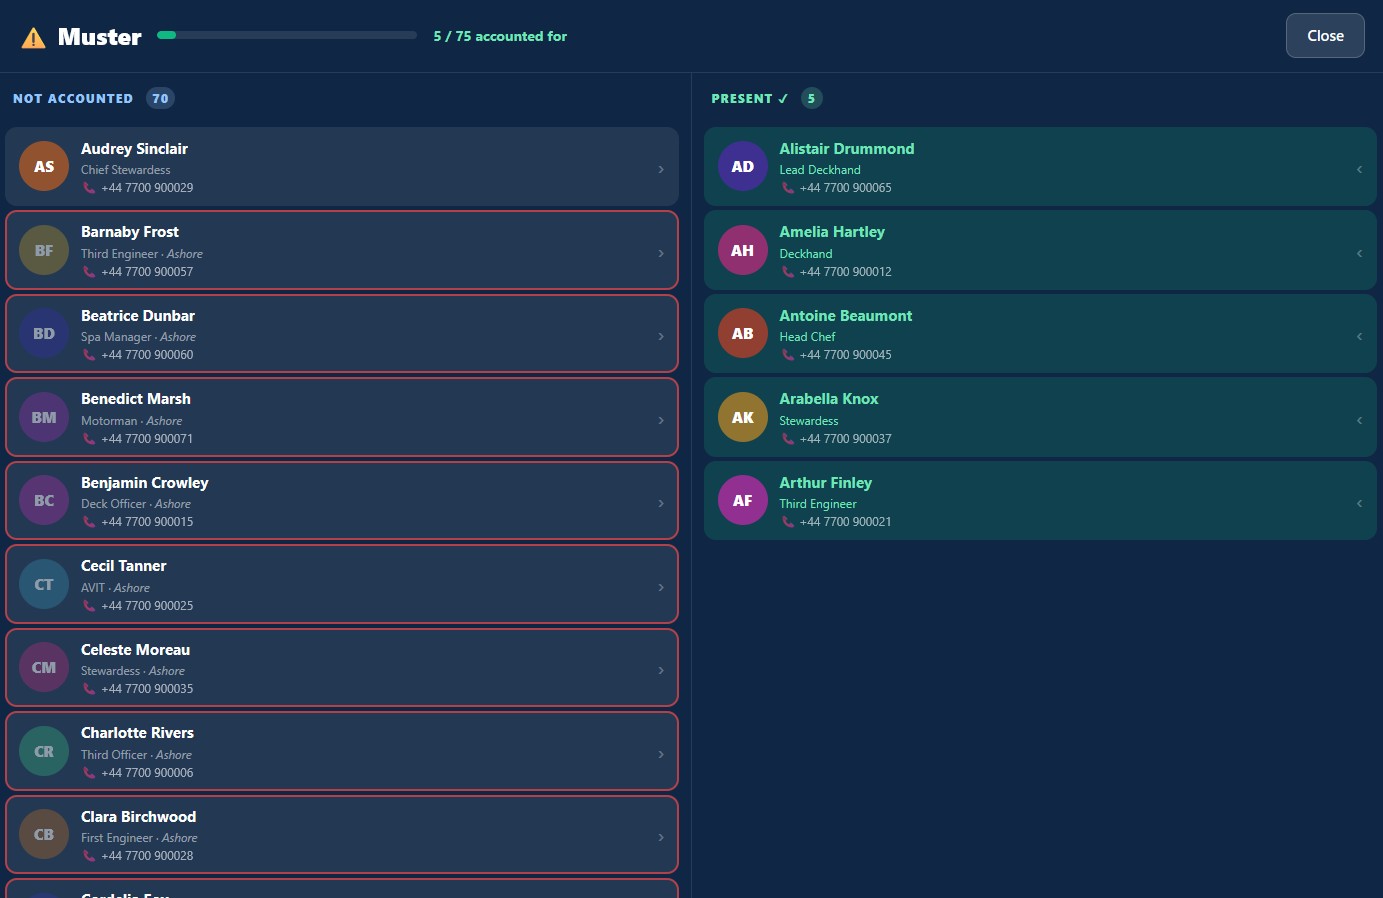
Two columns: Not Accounted on the left, Present on the right. As crew arrive at the muster station, the officer in charge taps their name to move them to Present. The progress bar at the top updates in real time (e.g. "5 / 75 accounted for").
Who needs to be there
The muster list includes:
- All crew currently signed in as Onboard
- All visitors currently signed in
- Crew flagged as Ashore are shown with a red outline (they shouldn't be aboard, but they're listed so you can confirm absence)
Calling absent crew
Each unaccounted crew member's card shows their phone number. Tap the number to call them directly from the iPad (assuming cellular or VoIP capability) — saves the time of looking them up.
Ending the muster
Tap Close in the top right to end the muster. A completion report is automatically saved against the date and time, viewable later from the admin dashboard. Useful for drill audit records.
7 Configuring Crew Board (Admin Side)
Several settings shape how the kiosk and dashboard behave. Find them in the admin panel sidebar.
Welcome Screen
Customise the vessel name, background image, time format, and welcome message shown at the top of the kiosk.
Board Behaviour
Set how long an inactive kiosk waits before returning to the Welcome screen, whether confirmation popups are required, and timeout behaviour for partial sign-ins.
Visitor Settings
Edit the safety briefing text shown to visitors before signing. Add fields you want to capture (vehicle registration, ID document type, etc.). Set the overdue-visitor flag time.
Sign-out Destinations
Customise the destinations shown to crew when signing out. Defaults are Ashore, Airport, and Going on Leave — add your own (e.g. "Crew Hotel," "Shipyard") if your vessel uses them regularly.
Access & Permissions
Control which crew roles can promote others Off Roster, configure muster, or override sign-outs. Lock down the management menu PIN.
General Settings
Joomla subfolder path (for kiosk URL generation), time zone, and other technical settings. Usually set once and never touched.
8 The Admin Dashboard
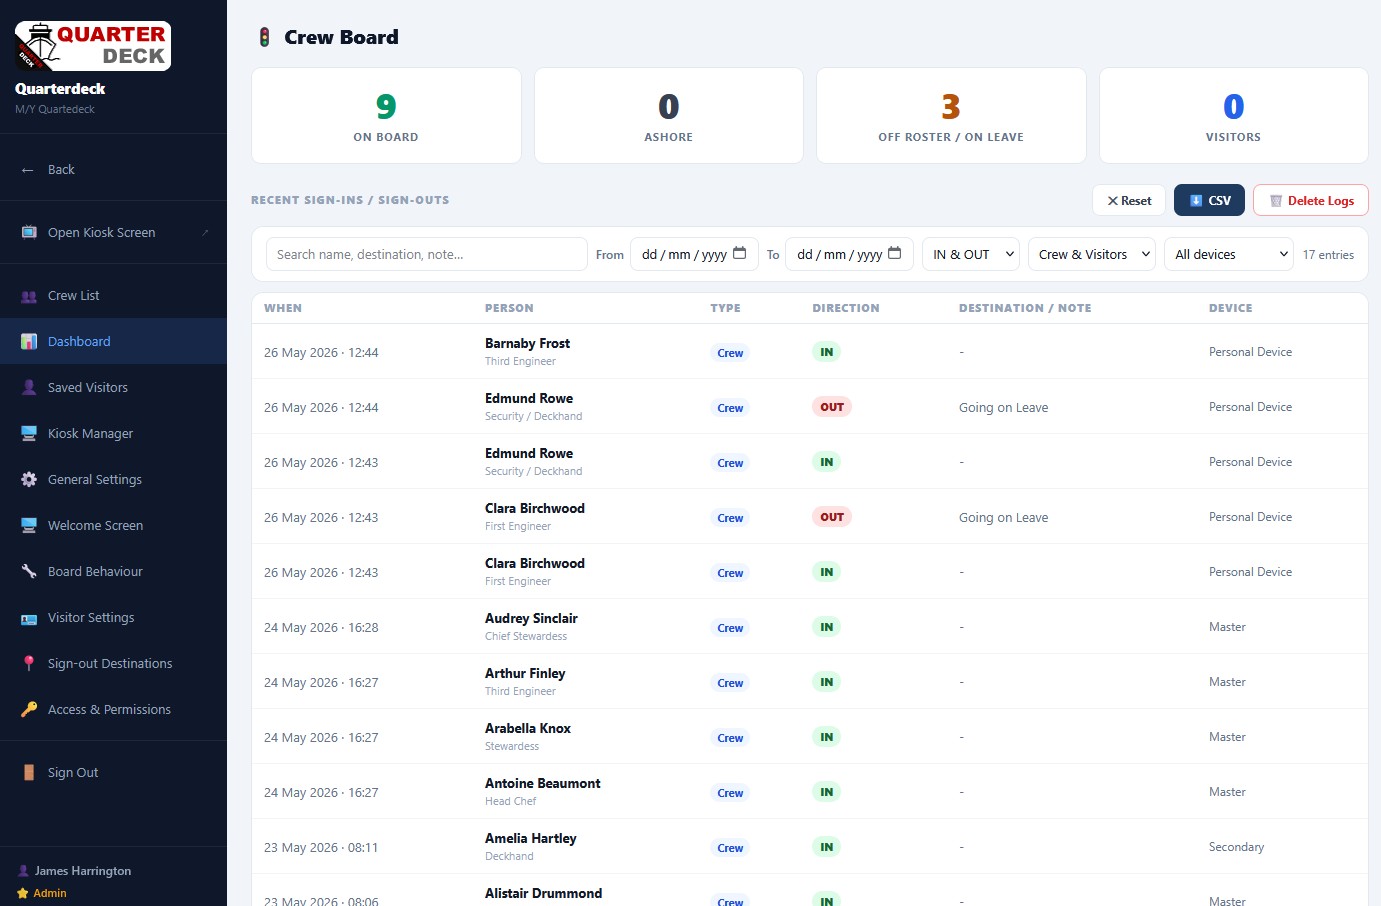
Open Crew Board → Dashboard in the admin panel. This is your real-time view of who's aboard and the history of every sign-in/out.
The four KPIs
The sign-in/sign-out log
Every action on every kiosk is logged here. The default view shows the most recent first. Each row tells you:
- When the action happened
- Person — name and position
- Type — Crew or Visitor
- Direction — IN or OUT
- Destination/Note — where they went and any note left
- Device — which kiosk recorded the action (Master, Secondary, Personal Device, etc.)
Filtering the log
The bar above the log lets you narrow by:
- Search — name, destination, or note
- From / To dates — limit to a specific date range
- IN & OUT — both directions, or just one
- Crew & Visitors — both, or just one type
- Device — show only entries from a specific kiosk
Exporting and managing the log
- CSV — download the filtered log as a CSV file (for audit records or external analysis)
- Reset — clear the current filters
- Delete Logs — permanently remove the displayed entries (admin-only; use with caution)
9 Saved Visitors
Frequent visitors (regular suppliers, technicians, owner's family) shouldn't re-enter their details on every visit. The Saved Visitors screen lets you store known visitors so they're recognised on future visits.
When a saved visitor signs in, the kiosk recognises their phone number (or name + company combination) and pre-fills the form, leaving just the purpose to confirm. Saves time at the gangway and keeps records consistent.
Use Saved Visitors to:
- Pre-register expected guests before they arrive (e.g. for a delivery scheduled tomorrow)
- Maintain a known-vendor list (so an unrecognised technician triggers a moment of attention)
- Bulk-edit visitor details when a company's contact person changes
10 The Sidebar — Quick Reference
The Crew Board sidebar is organised by frequency of use:
Daily / weekly
- Open Kiosk Screen — open this device as a kiosk (mainly for testing)
- Crew List — same crew list as Quarterdeck; shows current sign-in status
- Dashboard — the real-time KPIs and log (Step 8)
- Saved Visitors — manage known visitors (Step 9)
Configuration
- Kiosk Manager — register and manage iPads (Step 2)
- General Settings — Joomla path, time zone, technical settings
- Welcome Screen — kiosk welcome customisation (Step 7)
- Board Behaviour — kiosk timeout and behaviour settings (Step 7)
- Visitor Settings — safety briefing, capture fields (Step 7)
- Sign-out Destinations — customise destinations (Step 7)
- Access & Permissions — role-based controls (Step 7)
Navigation
- ← Back — return to the Quarterdeck Admin Panel
- Sign Out — end your admin session