Muster Stations — How-To Guide
Build the station bill, assign crew to muster positions, and run drills with confidence.
1 How Muster Stations Works (Concept)
Muster Stations is built on five concepts that work together. Understanding them in this order makes everything else easier to learn.
- Stations are physical locations on the vessel — Bridge, Main Saloon, Lower Deck Engine Room Corridor. Each station has a type: Muster, Emergency, or Medical.
- Teams are functional groups — Bridge Command, On Scene Command, Engineering, Emergency Team 1, Medical Team. Each team has a specific responsibility during an emergency.
- Muster Positions are the slots within each team — labelled with a unique muster number like D1, D3, H1, E4. Each position carries its emergency duty, station, and survival craft assignment.
- Crew are assigned to muster positions. Once a crew member is assigned to D3, they inherit all that position's details — they don't need to memorise anything.
- Kiosks are iPads at each team's muster station. During a drill, crew tap their own name on the kiosk to check in. The bridge sees everything in real time.
2 Setting Up Stations
Open Muster Stations → Setup → Stations.
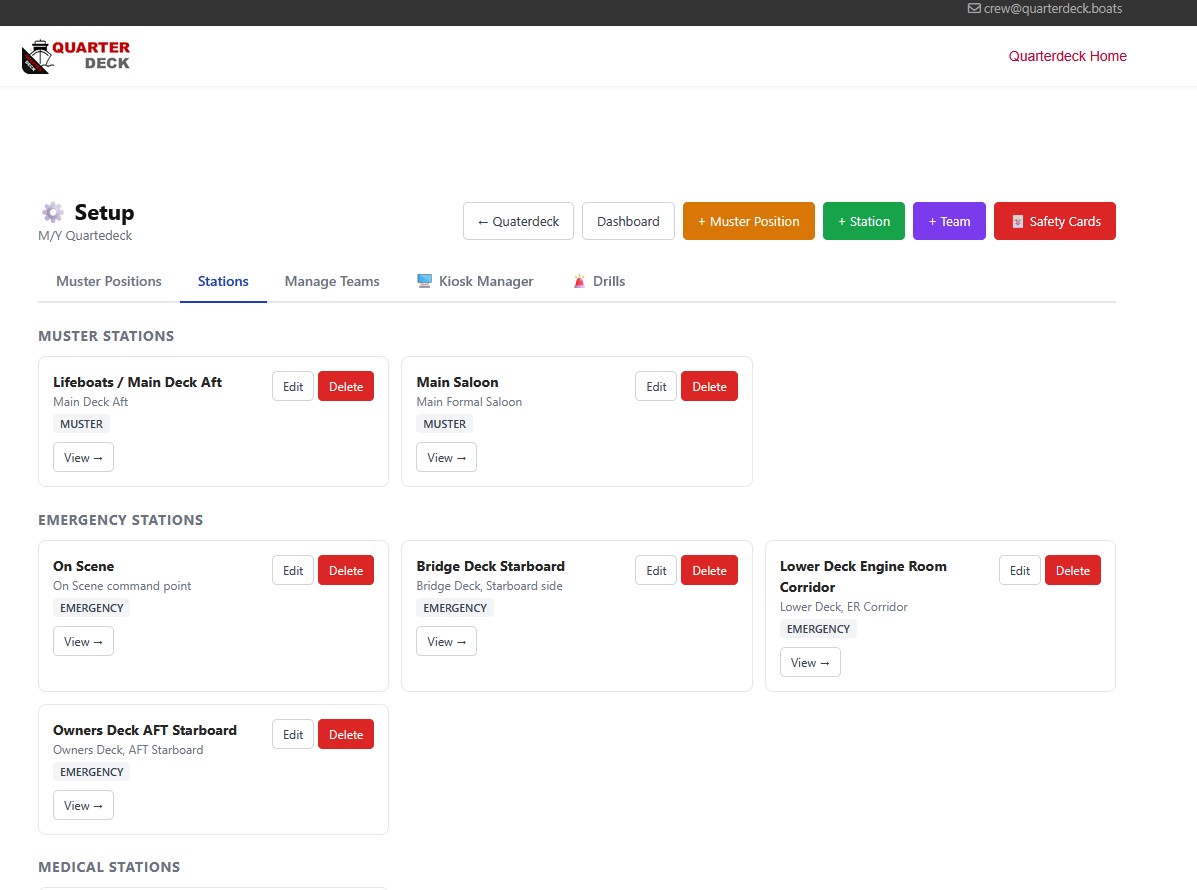
The three station types
- Muster Stations — where crew physically assemble during a general muster. Usually one or two locations (e.g. Lifeboats / Main Deck Aft, Main Saloon for guests).
- Emergency Stations — operational locations where teams perform their emergency duties (e.g. On Scene command, Bridge Deck Starboard, Engine Room Corridor).
- Medical Stations — locations dedicated to casualty care (hospital, medical kit locations).
Adding a station
Click + Station in the top right. Each station needs:
- Name — short, descriptive (e.g. "Lifeboats / Main Deck Aft")
- Description / Location — where it physically is on the vessel
- Type — Muster, Emergency, or Medical
Once saved, the station appears under its type heading on this screen.
3 Setting Up Teams
Open the Manage Teams tab.
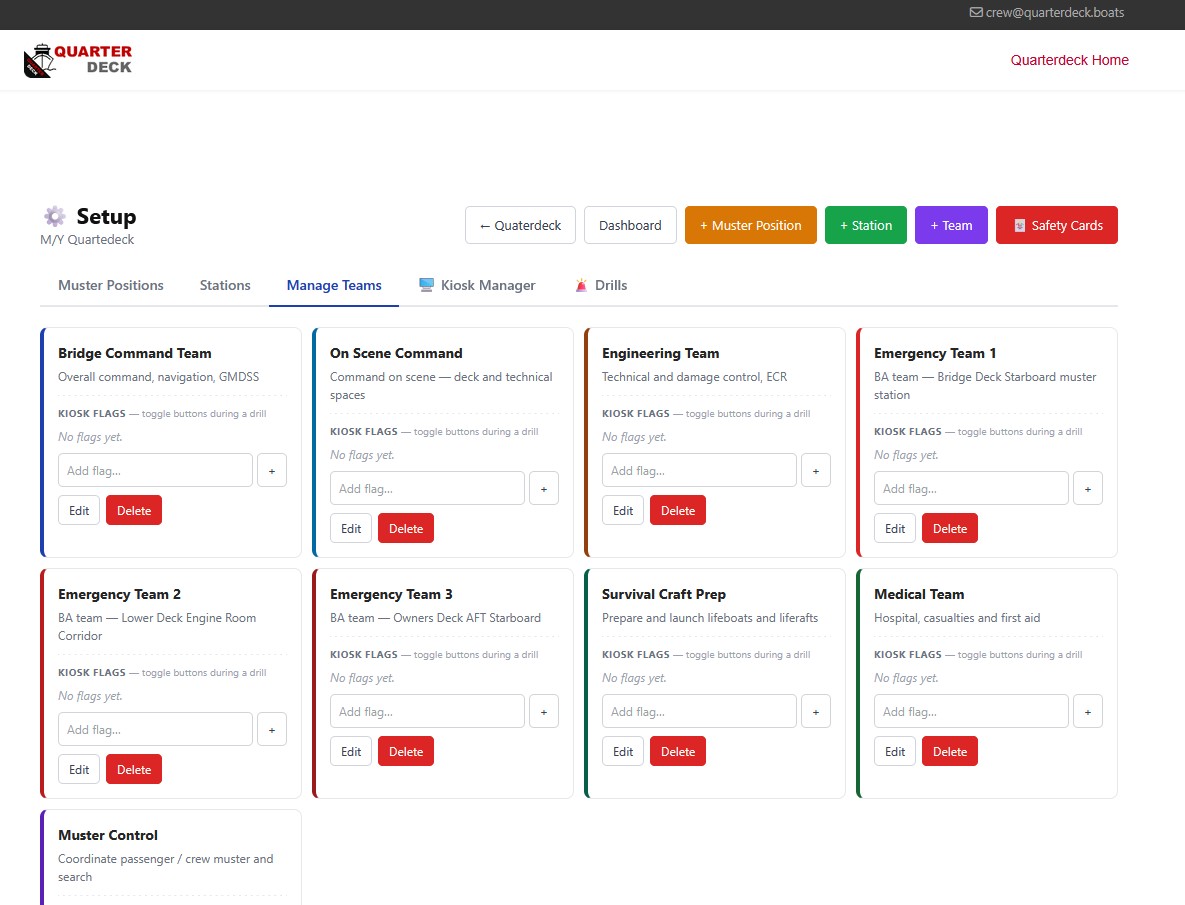
The typical team structure
A well-organised station bill usually has these teams, each colour-coded:
Adding a team
Click + Team in the top right. Each team needs:
- Name — short, role-based (e.g. "Bridge Command Team")
- Description — one sentence describing what they do
- Colour — a visual identifier; used on the muster grid and kiosk screens to distinguish teams at a glance
Kiosk flags
Each team can have kiosk flags — toggle buttons that appear on that team's kiosk during a drill. Typical examples:
- "BA team deployed"
- "Boundary cooling started"
- "Survival craft launched"
- "Casualty moved to hospital"
Type each flag in the Add flag… field and press +. The team leader can tap these during the drill to mark milestones — visible on the bridge dashboard in real time.
4 Defining Muster Positions
Open the Muster Positions tab — the most important screen in the whole component.
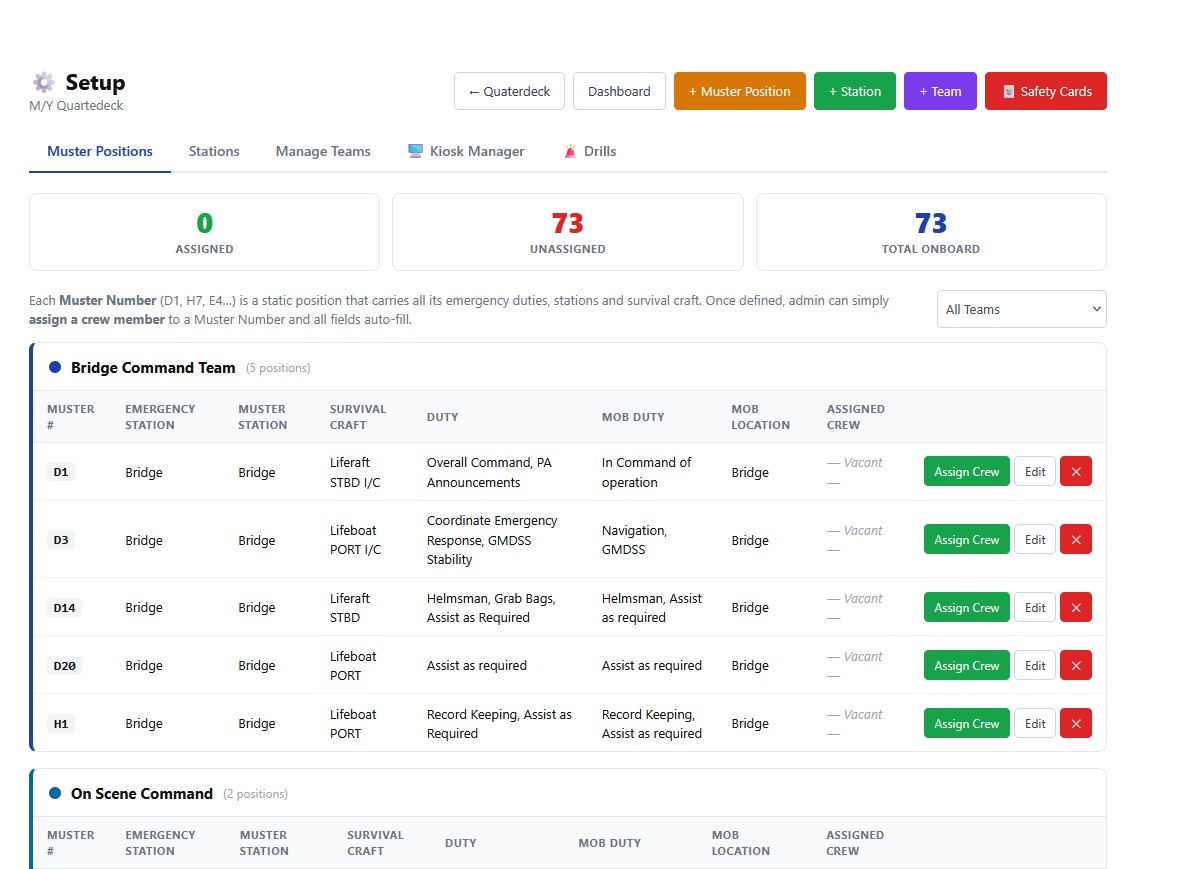
The three KPIs
Compare the three numbers: Assigned should equal Total Onboard on a well-mustered vessel. Anything else means crew aren't accounted for in the station bill.
What each position carries
Each muster position is a complete record with these fields:
- Muster # — unique identifier (D1, D3, D14, H1, E4, etc.). Crew memorise these.
- Emergency Station — where this person reports during an emergency
- Muster Station — where this person musters if a general muster is called
- Survival Craft — which lifeboat or liferaft they're assigned to
- Duty — what they do at the emergency station (e.g. "Overall Command, PA Announcements")
- MOB Duty — separate duty during a Man Overboard event
- MOB Location — where they go during MOB
- Assigned Crew — the actual person currently holding this position
Adding a muster position
Click + Muster Position in the top right. Choose the team, fill in all the fields, save. The new position appears under its team heading.
Assigning crew to positions
Once positions exist, the daily/weekly task is assigning crew. Click the green Assign Crew button on any row showing "— Vacant".

Select the crew member from the list. That's it — they now hold this position with all its duties. Their Safety Card (printable from the top right of the Setup screen) automatically reflects the new assignment.
5 Setting Up Kiosks
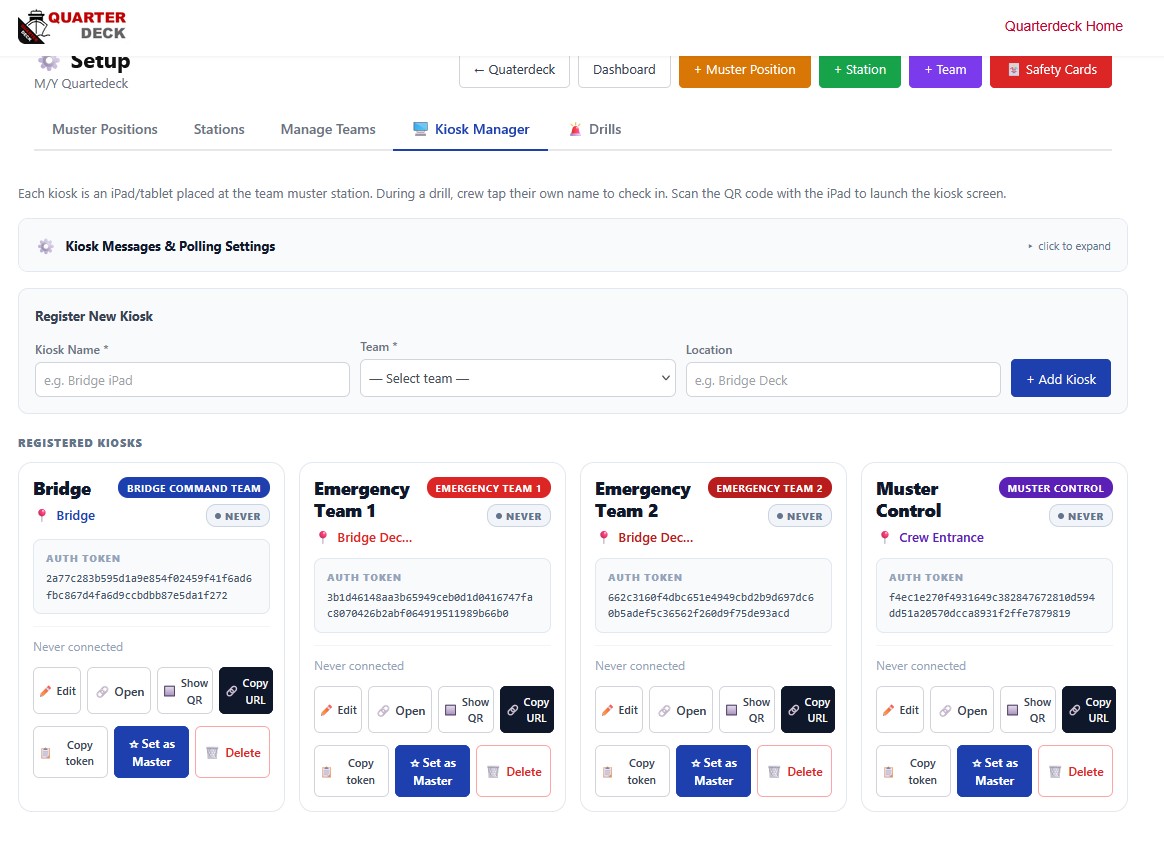
Open the Kiosk Manager tab. Each team that physically musters together gets a dedicated iPad at their station.
The kiosk concept
A muster kiosk is a fixed iPad mounted at a team's muster station. When a drill starts, the kiosk lights up showing only that team's crew. Each person taps their own name as they arrive. The bridge sees the check-ins live.
Registering a new kiosk
Fill in the form at the top:
- Kiosk Name — descriptive (e.g. "Bridge iPad")
- Team — which team this kiosk serves (Bridge Command, Emergency Team 1, etc.)
- Location — physical placement (e.g. "Bridge Deck")
Click + Add Kiosk. The kiosk appears in the Registered Kiosks grid below, each with its own auth token, QR code, and management buttons.
Setting up the iPad
For each kiosk, three things to do on the physical iPad:
- Open the URL on the iPad — either scan the QR code or paste the copied URL into Safari.
- Add to Home Screen via Safari's Share button — installs the kiosk as a fullscreen app.
- Enable Guided Access (Settings → Accessibility → Guided Access) — locks the iPad so crew can't accidentally exit the kiosk.
Master vs Secondary kiosks
If you have multiple kiosks for the same team (e.g. one primary and one spare), one is designated Master. The orange ★ Set as Master button promotes a kiosk; the previous Master demotes automatically. Same model as Crew Board: only the Master operates fully during a network outage.
Connection status
Each kiosk card shows its current status:
- NEVER — never connected (still being set up)
- ONLINE — currently connected and live
- OFFLINE — last seen recently but currently disconnected
6 Running a Drill
This is what all the setup has been building toward.
Starting a drill
From the Muster Stations Dashboard, click Drills → New Drill. Choose:
- Drill type — Fire, Abandon Ship, MOB, Other
- Date & Time — usually "now"
- Notes — optional context (e.g. "Quarterly drill, scenario: galley fire")
Click Start Drill. The clock starts; all team kiosks switch from idle to drill mode automatically.
What the bridge sees
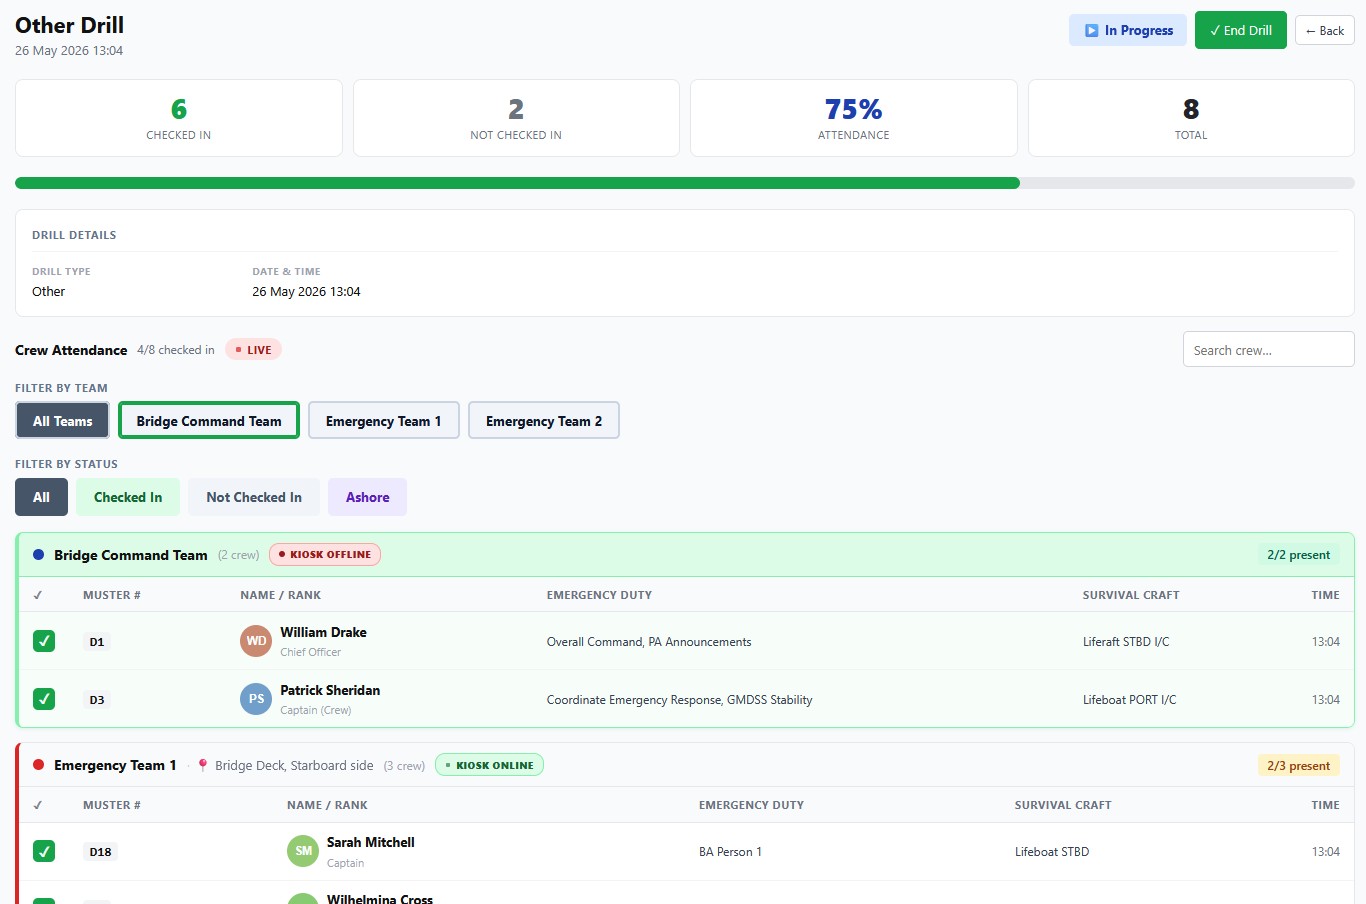
The dashboard shows four headline numbers at the top:
Filtering during the drill
- Filter by Team — focus on a specific team (e.g. "show me only Bridge Command")
- Filter by Status — All, Checked In, Not Checked In, or Ashore
- Search crew — find a specific person by name
Reading a team panel
Each team is shown as an expandable panel:
- Team name and colour — matches the colour you set in team setup
- Station and crew count — "Bridge Deck, Starboard side · 3 crew"
- Kiosk status — ONLINE / OFFLINE / KIOSK OFFLINE badge tells you whether their iPad is connected
- Attendance fraction — "2/3 present" in the top right
- Roster table — each position with crew member, emergency duty, survival craft, and check-in time
What the team kiosks show
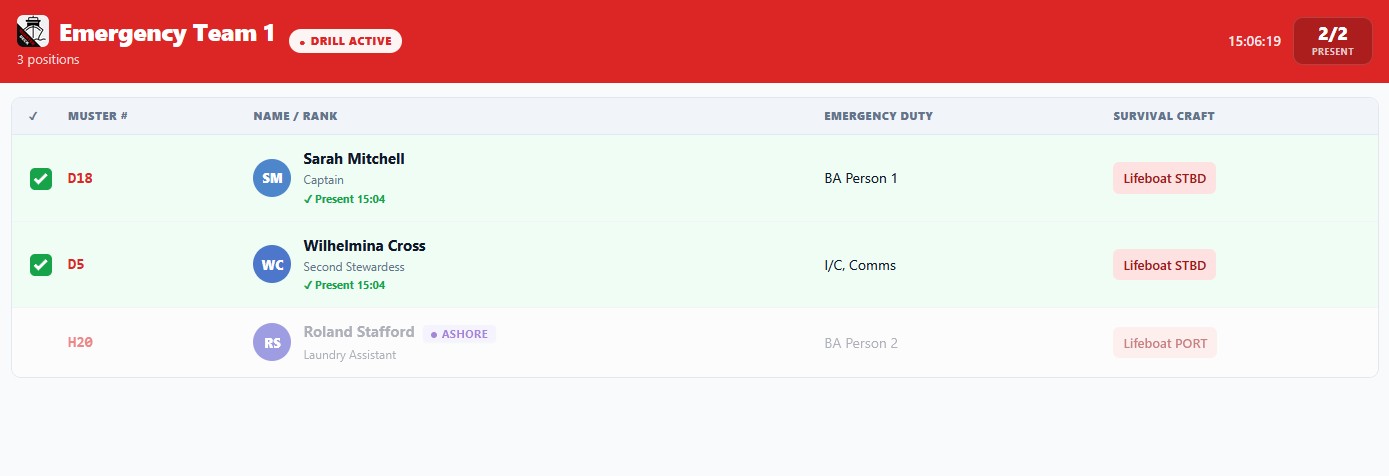
On the team's iPad, crew see only their own team:
- Red header — "DRILL ACTIVE" indicator, kept visually loud on purpose
- Live clock — current time, large and visible from across the room
- Attendance fraction — "2/2 PRESENT" in the top right
- Crew rows — muster number, name, rank, emergency duty, survival craft
- Check-in column — empty box becomes a green ✓ when crew taps their name
- Status row — shows "Present 15:04" once checked in
- Ashore label — crew currently ashore are greyed out with an ASHORE badge; they're listed so the team leader can verify the absence
Calling absent crew
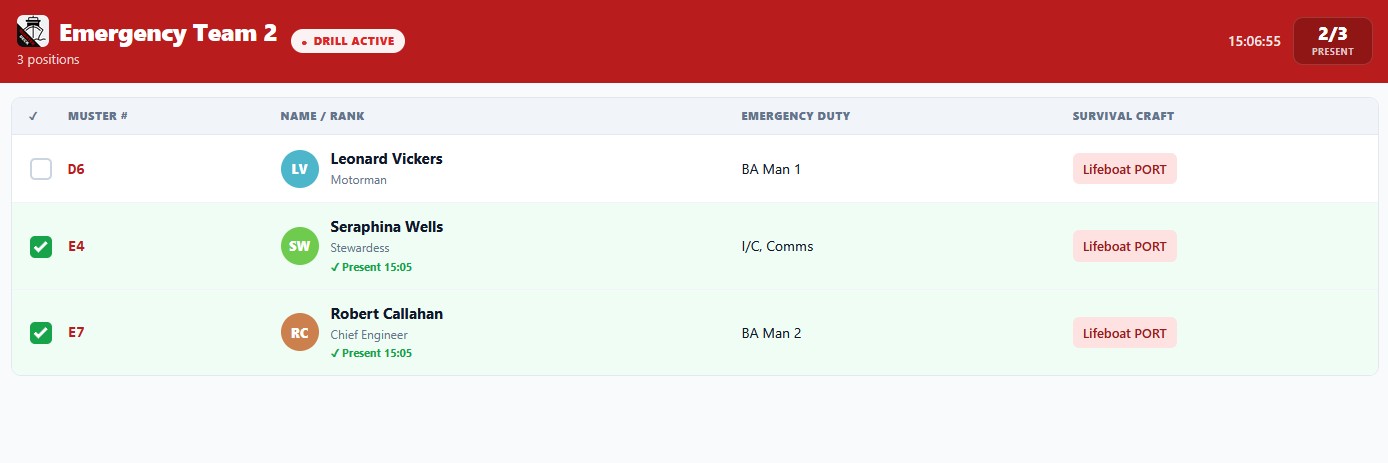
Tap an unchecked-in crew member's row to see their phone number. Tap the number to call them directly from the iPad — saves the time of looking them up in a separate system.
Ending the drill
When the drill is complete, click End Drill from either the dashboard or the kiosk management menu. The system:
- Records the end time
- Captures the final check-in state
- Saves a complete drill report (drill type, duration, attendance %, individual check-in times, any flags raised)
- Returns all kiosks to idle mode
7 Drill History & Reports
Every drill produces a complete record, accessible from Muster Stations → Setup → Drills.
What each drill report contains
- Date & time — when the drill started and ended
- Type — Fire, Abandon Ship, MOB, etc.
- Duration — total time from start to end
- Final attendance — percentage and absolute numbers
- Per-crew check-in times — exactly when each person tapped in
- Kiosk flags raised — milestones the team leaders marked
- Notes — any free-text from before, during, or after the drill
Why this matters for audits
Flag states and class societies require regular drill records. The Quarterdeck drill report is detailed enough to satisfy most audit requirements and can be exported as PDF. More importantly, the per-crew check-in times let you spot patterns over time — which crew are consistently late, which teams need refresher training, where the drill bottlenecks are.
8 Safety Cards
Each crew member has a personal Safety Card — a printable summary of their muster number, duty, station, and survival craft. From the top right of any Setup screen, click Safety Cards.
Safety Cards can be:
- Printed — physical cards for crew to keep in their cabin or with their PFD
- Digital — accessed through the Crew Portal on each crew member's phone
- Bulk-printed — generate cards for the entire crew at once when assignments change
9 The Sidebar — Quick Reference
Setup (all under the top tab bar)
- Muster Positions — the station bill itself (Step 4)
- Stations — physical locations (Step 2)
- Manage Teams — functional groups (Step 3)
- Kiosk Manager — iPad registration and management (Step 5)
- Drills — drill history and reports (Step 7)
Top-right action buttons
- ← Quaterdeck — return to the Quarterdeck Admin Panel
- Dashboard — live drill view (Step 6)
- + Muster Position — add a new position
- + Station — add a new station
- + Team — add a new team
- Safety Cards — print or generate crew cards (Step 8)