
Car Pool — How-To Guide
Manage the vessel's vehicles, oversee bookings, and configure crew self-service.
1 Setting Up the Fleet
Before anyone can book a vehicle, the vehicles need to exist in the system. Open Car Pool → Fleet from the sidebar.
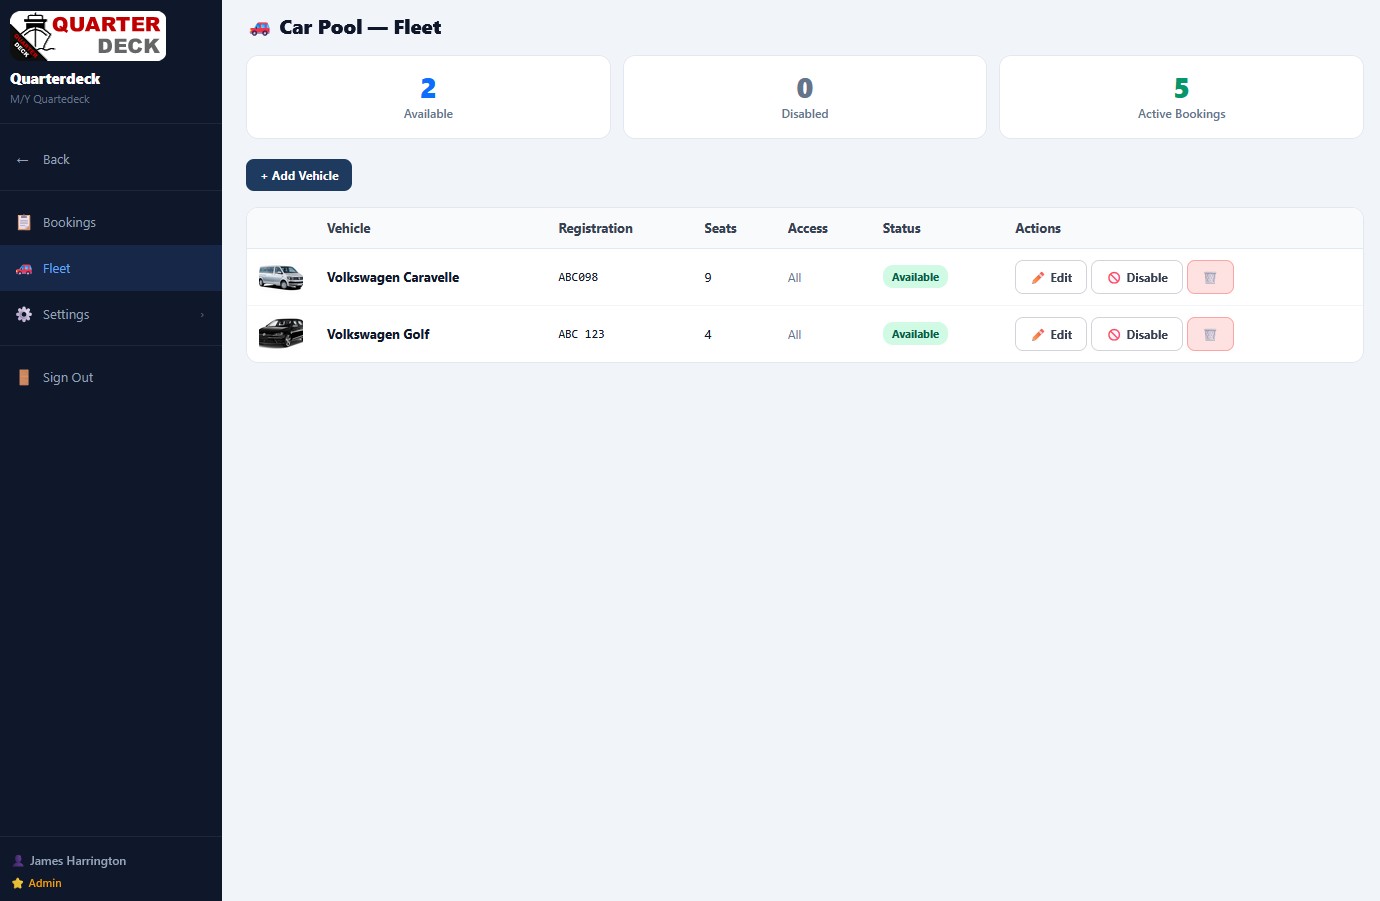
The three KPIs
Adding a vehicle
Click + Add Vehicle. You'll be asked for:
- Vehicle name — make and model (e.g. "Volkswagen Caravelle")
- Registration — number plate
- Seats — total capacity, used to validate the Passengers field on bookings
- Access — who can book this vehicle (All, or restricted to specific roles)
- Photo — optional, but recommended; helps crew recognise which vehicle they've booked
Click Save and the vehicle appears in the list, automatically marked as Available.
Editing or removing a vehicle
- Edit (blue) — update name, registration, seats, photo, or access rules.
- Disable (red outline) — temporarily take the vehicle out of service without deleting it. Booked but not yet started bookings remain attached; crew can't make new bookings until you re-enable it. Useful for service, repairs, or off-season storage.
- Delete (trash icon) — permanently remove the vehicle and all its historical bookings. Rarely the right choice — Disable is almost always better.
2 Viewing All Bookings
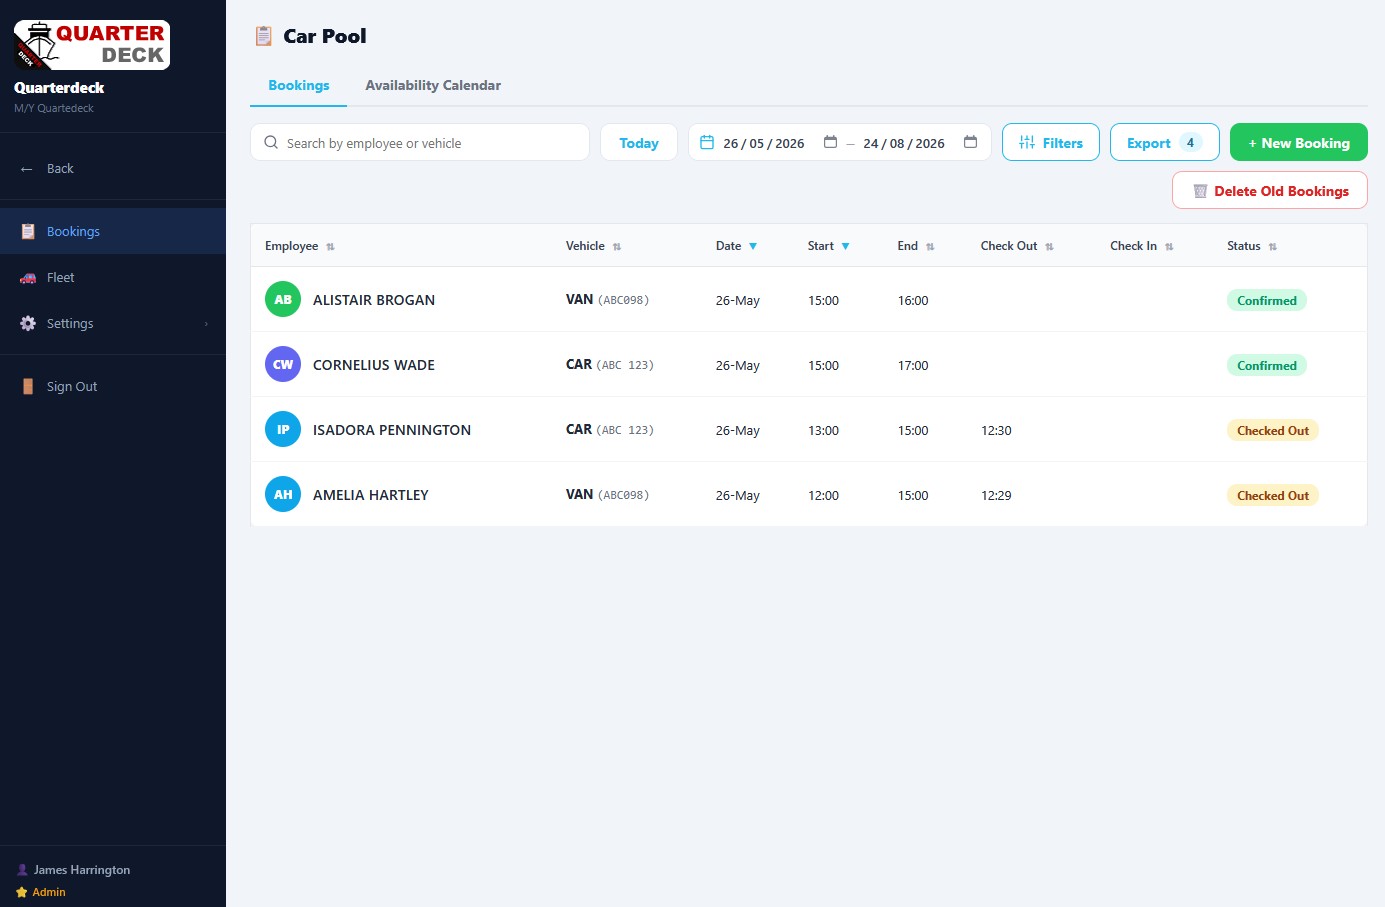
Open Car Pool → Bookings from the sidebar. This is the admin's master view — every booking, every vehicle, every crew member, with search and filter controls.
What each booking shows
Each row tells you:
- Employee — who made the booking (their initials avatar + name)
- Vehicle — which vehicle, with the registration in small text below
- Date — the booking date
- Start / End — booking time window
- Check Out — actual time the vehicle was taken
- Check In — actual time the vehicle was returned
- Status — the current state of the booking
Booking statuses
A booking moves through these states over its life:
- Confirmed — booked but not yet started. Vehicle is reserved in the calendar.
- Checked Out — crew has taken the vehicle. Check Out time is recorded; Check In is empty.
- Completed — vehicle returned. Both Check Out and Check In times recorded.
- Cancelled — booking voided. Vehicle freed up.
Searching and filtering
- Search — by employee or vehicle
- Today button — quick filter to just today's bookings
- Date range — set From/To dates
- Filters — open a panel for more controls (vehicle, status, employee, department)
Exporting bookings
The Export button downloads the currently filtered list as a CSV — useful for reporting, expense reconciliation, or sharing with the office. The number badge shows how many bookings will be exported.
Cleaning up old bookings
The Delete Old Bookings button removes historical entries older than a configurable threshold. Useful for keeping the list manageable on long-running installations.
Creating a booking on behalf of crew
The green + New Booking button lets admins create bookings on behalf of any crew member — useful for advance bookings (e.g. owner's car for an arrival next month) or when crew need help.
3 The Availability Calendar
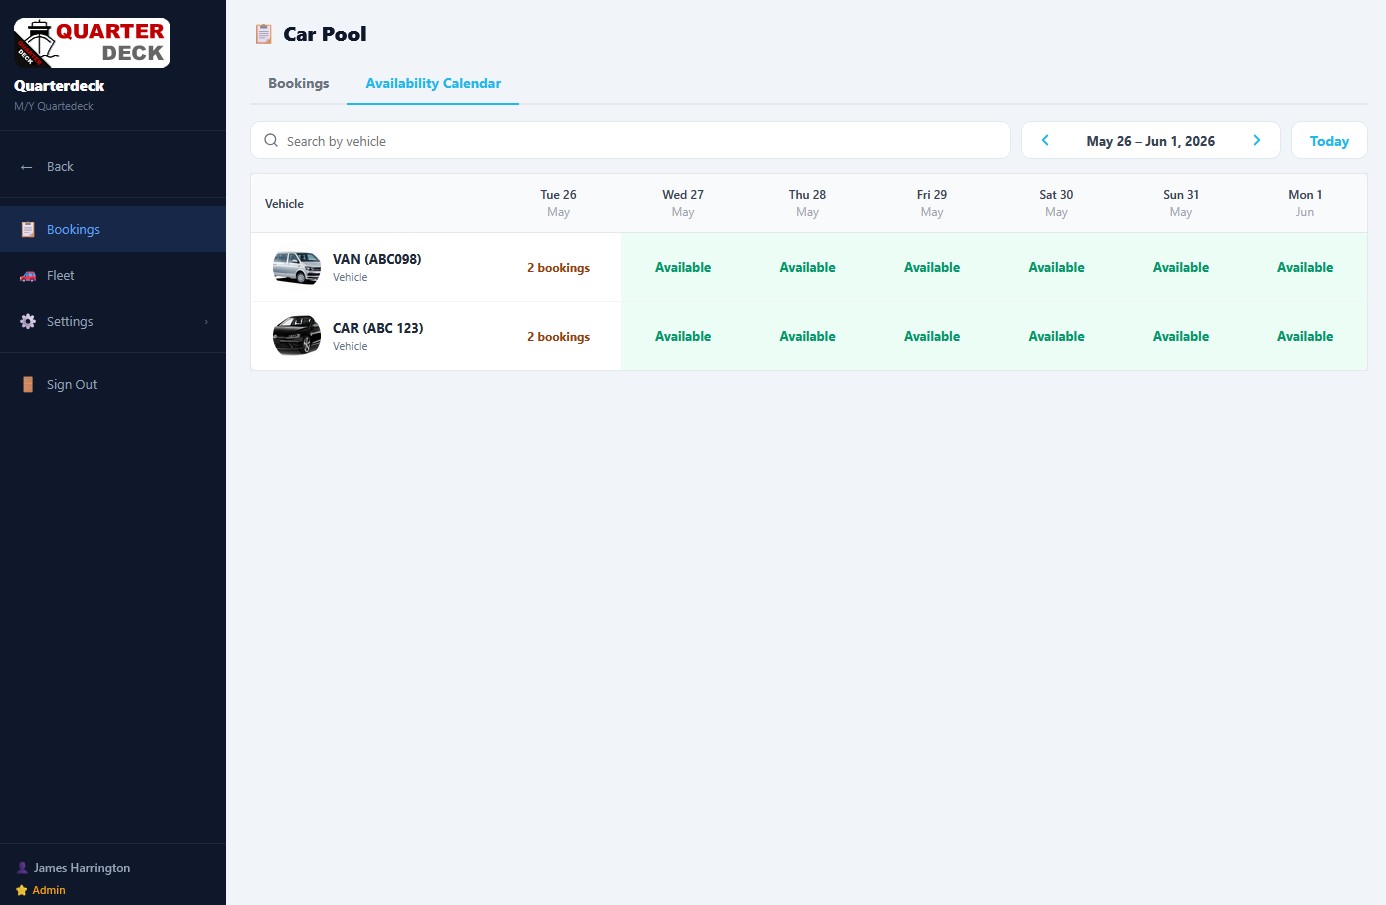
Switch to the Availability Calendar tab at the top of the Bookings screen. This is a week-at-a-glance view, vehicle by vehicle.
Reading the calendar
Each cell shows one vehicle on one day:
- Available — the vehicle has no bookings that day
- "N bookings" — a number followed by "bookings" means there's at least one booking on that day. Click into it to see the booking details.
Navigation
- ← / → arrows — jump to the previous or next week
- Today — return to the current week
- Search by vehicle — filter the calendar to a specific vehicle (useful if you have a large fleet)
- Bookings tab — for finding a specific booking ("who took the van yesterday?")
- Availability Calendar — for planning ("which car is free for the owner's airport run next Thursday?")
4 Editing or Cancelling a Booking
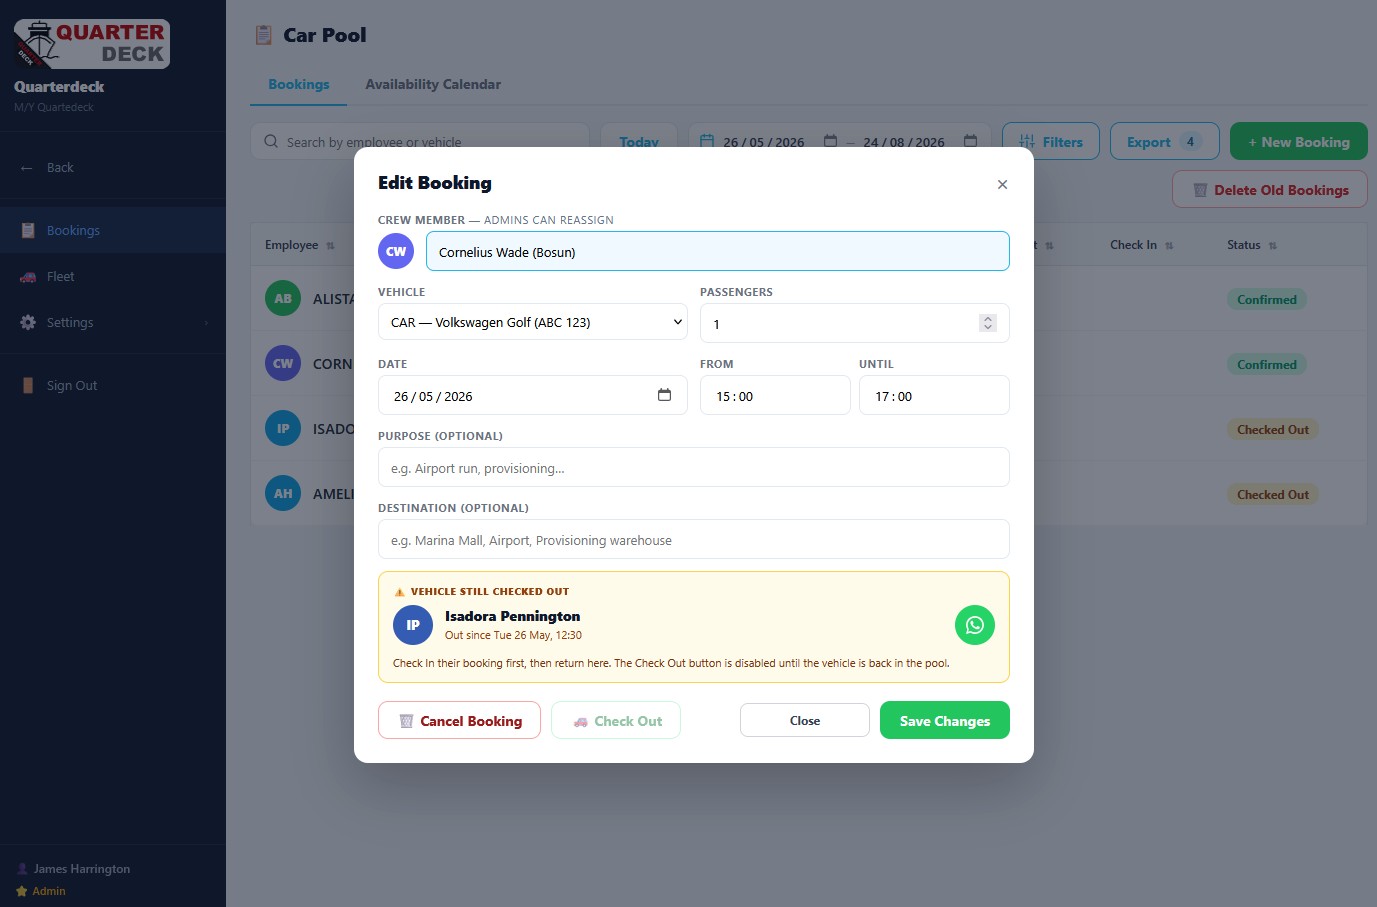
Click any booking row in the list to open the Edit Booking dialog. This is where admins handle reassignments, time changes, and the day-to-day messiness of vehicle scheduling.
What admins can change
Unlike the crew-facing booking form, admins have full edit rights:
- Crew member — reassign the booking to a different person (e.g. someone called in sick, swap to the colleague taking the run)
- Vehicle — change to a different vehicle if availability shifts
- Passengers — number of people travelling (validated against the vehicle's seat count)
- Date / From / Until — adjust the booking window
- Purpose — optional free-text (e.g. "Airport run, provisioning")
- Destination — optional free-text (e.g. "Marina Mall, Airport, Provisioning warehouse")
The vehicle-status warning
If the vehicle is currently checked out to someone else, you'll see a yellow warning box at the bottom:
This prevents the most common conflict: trying to give a vehicle to a new user while it's still physically with someone else.
Cancelling a booking
The red Cancel Booking button voids the booking entirely. The vehicle is freed up immediately for others to book. The crew member is notified (if you've enabled notifications).
Checking out / checking in from admin
The Check Out button lets an admin record a vehicle leaving the pool — useful if the crew member forgot to do it themselves at the kiosk. Once checked out, the button changes to Check In for recording the return.
5 Access & Permissions
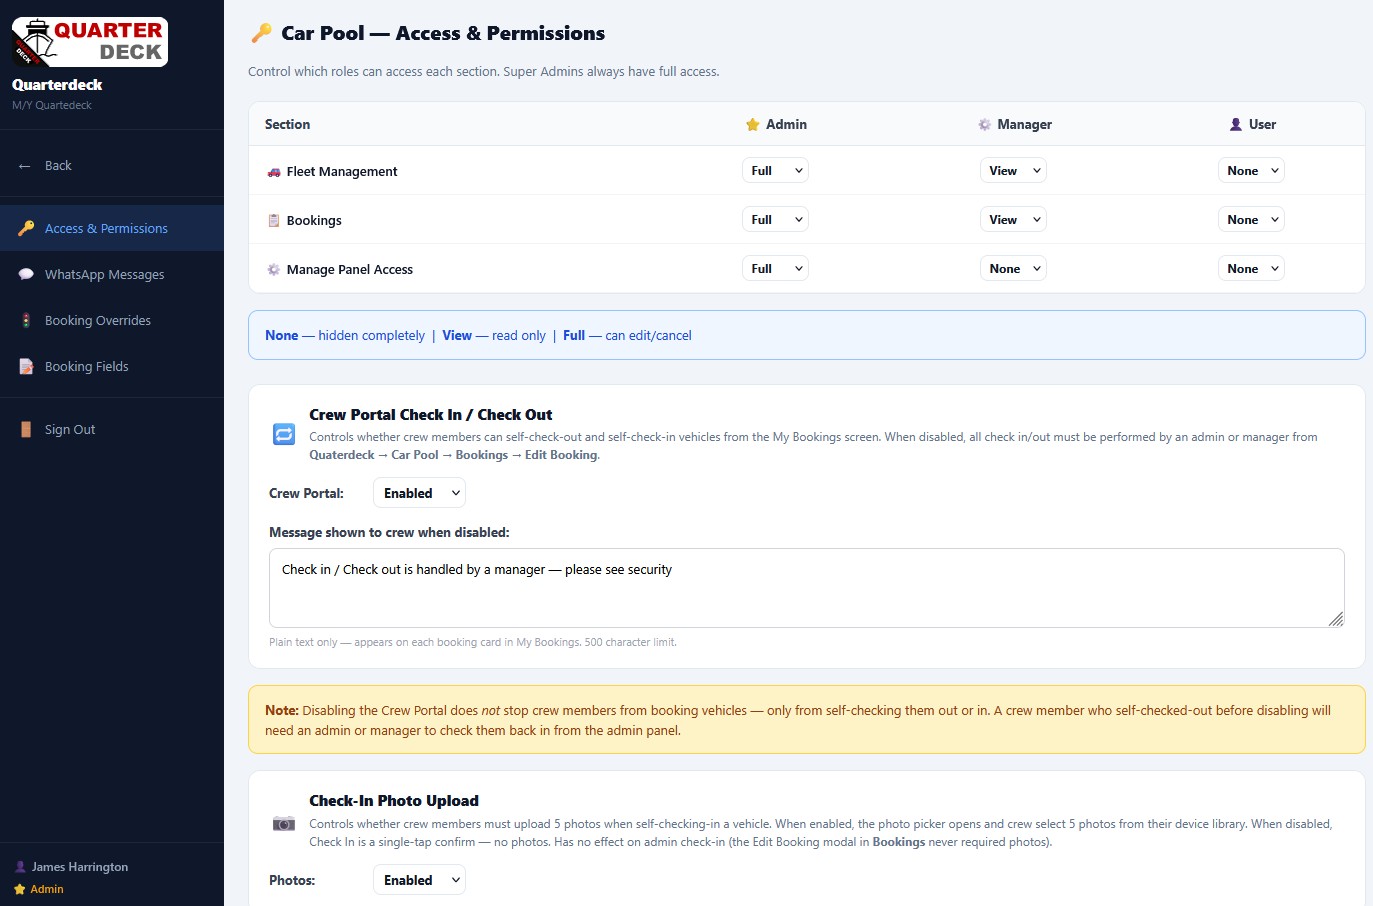
Open Car Pool → Settings → Access & Permissions. This is where you control which sections of Car Pool each role can see and what they can do.
The role matrix
Three roles, three sections, three permission levels each:
- Admin — typically gets Full access everywhere
- Manager — usually View-only on most sections (can see, but not edit)
- User — usually None on the admin sections (they only use the Crew Portal)
The three permission levels:
- None — section is hidden completely
- View — read-only access
- Full — can edit and cancel
The three sections
- Fleet Management — add, edit, disable, and delete vehicles
- Bookings — view and edit all bookings across the vessel
- Manage Panel Access — this very screen, controlling the matrix itself
Crew Portal Check In / Check Out
Below the matrix is a powerful toggle: Crew Portal Check In / Check Out.
- Enabled (default) — crew can self-check-out and self-check-in vehicles from the My Bookings screen in their portal. Fast, low-friction, no admin needed for routine pickups.
- Disabled — all check in/out must be performed by an admin or manager from the admin panel. Slower, but gives the master or chief tighter control over the keys.
When disabled, you set a custom message shown to crew:
"Check in / Check out is handled by a manager — please see security"
Check-In Photo Upload
Below the Crew Portal toggle is another control: Check-In Photo Upload.
- Enabled — crew must upload 5 photos when self-checking-in a vehicle (typically front, back, two sides, and dashboard/fuel gauge). The photo picker opens automatically, and the crew select 5 photos from their device library.
- Disabled — Check In is a single-tap confirm — no photos required.
This is hugely valuable for accountability — if a vehicle comes back damaged, the photos taken at the previous check-in establish the baseline. Doesn't apply to admin check-ins (where the assumption is the admin is there in person).
6 Other Settings (Sidebar Reference)
The sidebar gives you access to other configuration screens. Most are set once and rarely touched.
Booking Overrides
Pre-configured exception rules for specific situations — e.g. "the owner's car cannot be booked by anyone below Officer rank," or "no bookings during scheduled service windows." Useful for vessels with mixed-role fleets (crew runabout vs. owner's vehicle).
Booking Fields
Customise the optional fields shown to crew when making a booking. The defaults are Purpose and Destination, but you can add Cost Centre, Project Code, or anything else your vessel tracks.
WhatsApp Messages
Configure templates for the WhatsApp notification button visible on the admin Edit Booking dialog. Useful for "vehicle still checked out" reminders, late-return prompts, or "your booking starts in 30 minutes" messages.
General Settings
Time zone, currency, photo upload limits, booking buffer time (gap required between consecutive bookings on the same vehicle).
7 The Sidebar — Quick Reference
Daily use
- Bookings — full booking list (Step 2)
- Fleet — manage vehicles (Step 1)
Configuration
- Settings → Access & Permissions — role matrix and crew portal controls (Step 5)
- Settings → Booking Overrides — vehicle-specific rules
- Settings → Booking Fields — custom fields on the booking form
- Settings → WhatsApp Messages — notification templates
- Settings → General Settings — time zone, buffers, limits
Navigation
- ← Back — return to the Quarterdeck Admin Panel
- Sign Out — end your admin session